Now that you’ve read through the depth of field lessons you may be thinking: Ok then, but what if we need to get more than one person/dog in focus?
Or, every time you try and photograph a dog and a person, only one of them is in focus.
Of course, this all comes back to the plane of focus.
In this lesson I’m going to use the term “group photo”. This could refer to a group of 2 or more dogs, or dog and owner, or multiple dogs and an owner… the concept is the same.
Two methods for group photos
There are three ways to take in-focus photos of multiple subjects.
- Use a wide plane of focus so even if they aren’t in a perfect line, they’ll still all be in focus
- Make sure they’re in a perfect line
- Take multiple photos, focusing on each subject, and edit the photos together in Photoshop.
Obviously each on of these has their pros and cons, so let’s explore.
Option 1: Change your plane of focus
In general, when we’re taking portrait photos, we want a soft, blurry background and narrow depth of field. This helps eliminate distractions, gives us background and foreground blur, and generally just suits the style more.
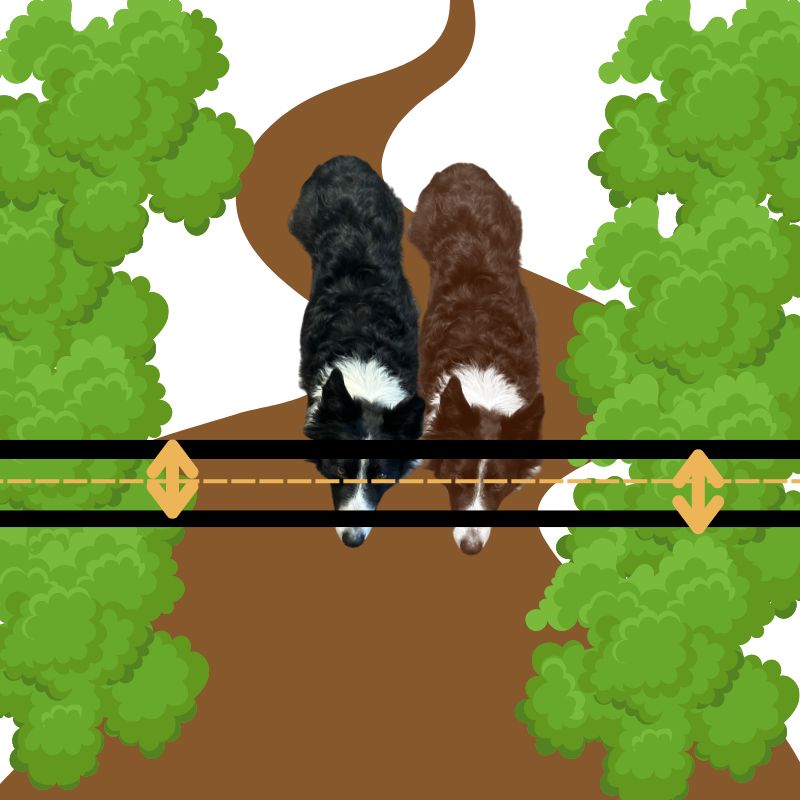
But of course, with a narrow depth of field you can run into trouble with multiple subjects. Let’s assume our plane of focus is only a few cm wide. If one subject is even just a little bit forward or back from where the camera centred its focus, that subject will be outside the plane of focus. So the nose may be in focus because it’s still inside that plane… but the eyes won’t be.
Below, I’ve created this scenario. The dashed yellow line is the centre of the plane of focus and will be the sharpest area of the photo. From there, it rapidly starts losing focus as it gets further or closer from that line.
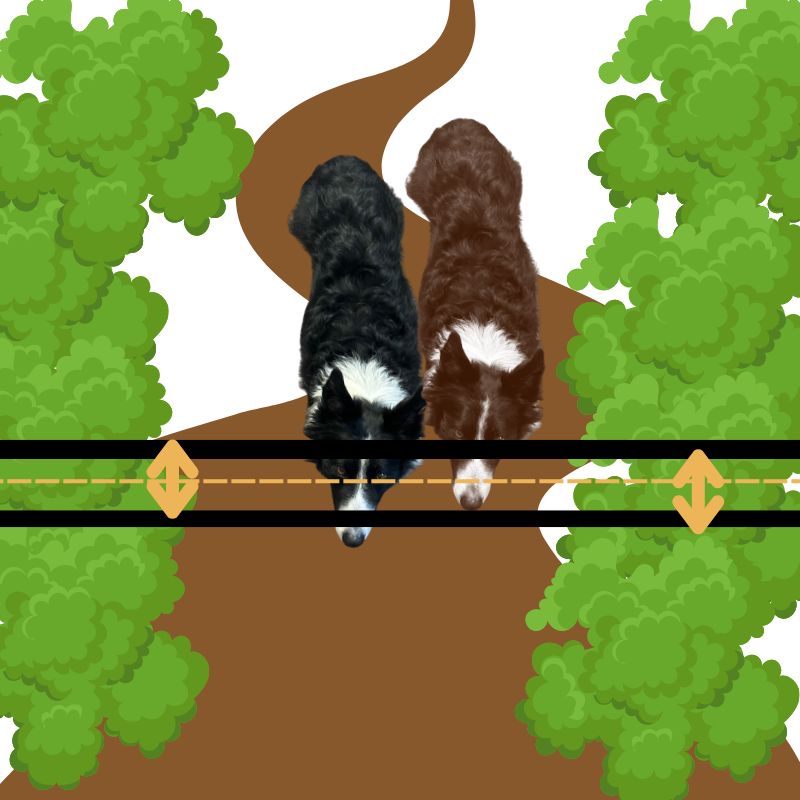
You can see exactly this occurring in the photo below of Loki & Journey. Loki’s eyes and most of his nose are in focus… but only Journey’s nose is. Notice how he’s sitting slightly back from Loki. In this photo, I focused on Loki’s eye (because I use Option 3 to take group photos).
If I had wanted both dogs to be in focus in this situation, without moving either of them, I would have a couple of options to do so:
- Narrow my aperture. This was taken at f/1.8
- Move further away from them
- Possibly use a wider angle lens.
Can you see though, that each of these options comes with its own set of difficulties?
I think that in order to get both dogs in focus with my 135mm lens, even with them only being slightly apart, I would be looking at at least f/4, f/5.6, maybe f/7… maybe even narrower. The further out of line they are, the narrower I would need to make my aperture.
This of course means I would need to put my ISO up. The settings were: f/1.8, 1/400 sec, ISO 640. If I wanted to go to f/5.6, the settings would need to be: f/5.6, 1/400 sec, ISO 6400.
You can see this is a HUGE difference in settings, with potentially a large loss of image quality, more noise, less detail etc. It’s really only feasible on a bright, potentially sunny day.
Add to that, you’re going to get a lot more detail in the background/near surroundings of your image too.
You could mix these methods up – move further away from your dogs AND narrow the aperture… but this is also going to mean less pixels making up the image of the dog (less detail for the dog), and again, more of the background & near surroundings in focus.
If the two (or three or four) subjects are even further apart – like a dog sitting on a person’s lap, then the plane of focus is going to need to be even WIDER to get them both in focus.
Option 2: Make sure they're in a perfect line
By lining your dogs/dog and subject up perfectly, you can use a narrow plane of focus and still have everything and everyone in focus.
Speaking from experience, this RARELY happens and is a very risky way to go about getting group photos. One of your subject could be 2cm too far back, and their eyes will be out of focus. Dogs move. People move.
I think of all the group photos I’ve ever done, I can think of MAYBE 3 where I haven’t used option 3, but have simply lucked into having a photo with both dogs in focus straight out of camera.
Notice how Laura and Dusty are side-on to me. This is going to make it MUCH easier to get them both in focus, than if they are facing forward looking forward the camera.
I have so few examples of using this option that I honestly can’t find any more examples!
Option 3: Multiple Photos & Photoshop
The last method is definitely my preferred method.
Essentially, I take some photos of dog 1, and some photos of dog 2. I bring both photos into Photoshop, and perform a headswap. The technique is quite simple. If you’re in the Learning Journey, you can check out the lesson here.
This technique requires some editing skill, but it means your two subjects can be out of line (within reason), and you can keep your aperture nice and wide for that soft, creamy background.
Here are some examples where I’ve used this technique.
You can probably safely assume that in 99% of my multi-subject photos, I will have done a head (and/or body) swap.
In the cast of the backlit photo of Loki and Journey on the stump, I think the final photo of Journey was a combination of 3-4 different images to get him looking how I wanted him to look.
Conclusion
There’s no way to “Cheat” depth of field. It’s physics. You can actually find calculators online that will tell you how wide your depth of field will be depending on how far you are from your subject, and what aperture you’re shooting at.
This one is excellent, as you can slide things around, adjust the settings, and see how it changes. Bring the model right up close and watch her nose go out of focus, then come back into focus as you move her backwards. Down the bottom you will see the “Depth of field” and how it goes from mere centimeters wide, to meters wide – of course being able to be affected further if you change your aperture.

