
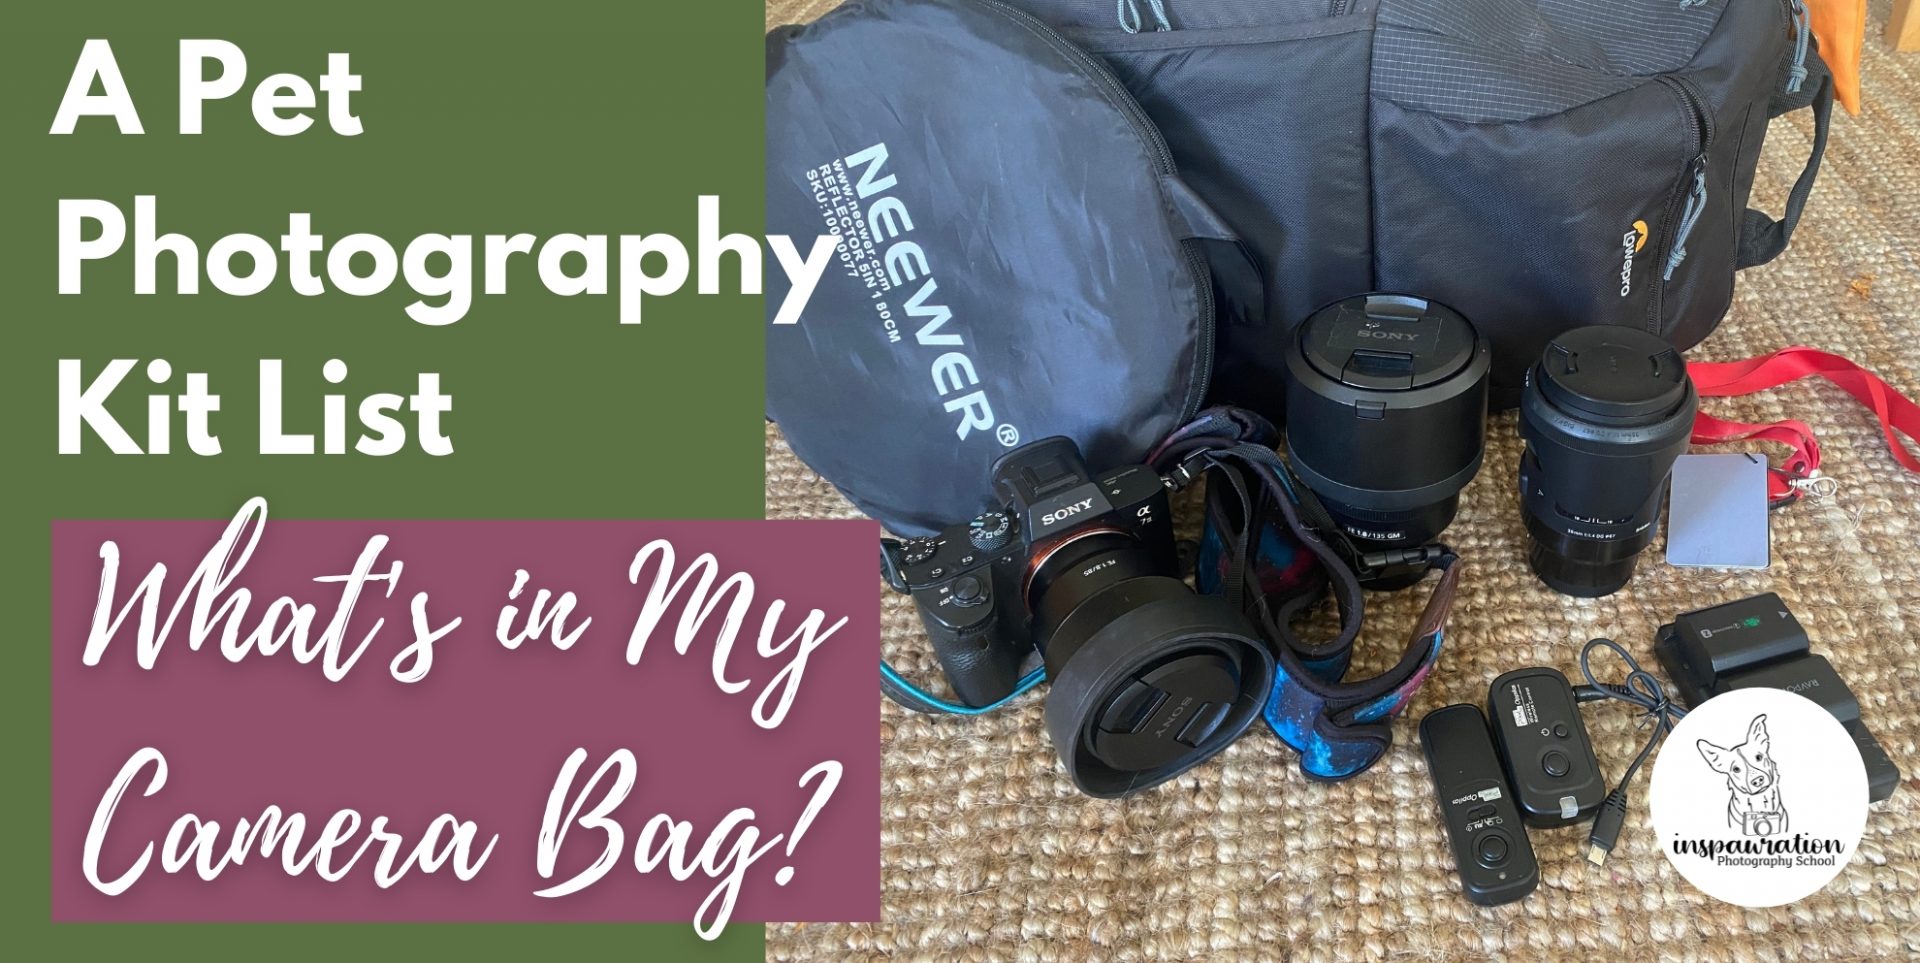
Don’t you just love a ‘what’s in my camera bag?’… or is it just me getting sucked into a very specific YouTube hole?
Anyway – I’m always obsessed with knowing what essential items & quirky personality pieces people carry with them. But it’s also super helpful to know what to take with you when you are heading out on a new adventure! Whether it’s a trip to Disney World, a wild camping weekend or…a dog photography shoot!
That’s why I thought it would be a neat idea to share my official (*drumroll please*) Pet Photography Kit List! Sharing the essential equipment & all-important pet photography accessories I take with me on every shoot, whether I’m working with a client or doing test shots with my two collies Journey & Loki.
So What’s in My Camera Bag?
Let’s start with probably the most essential piece… the bag to hold it all in!
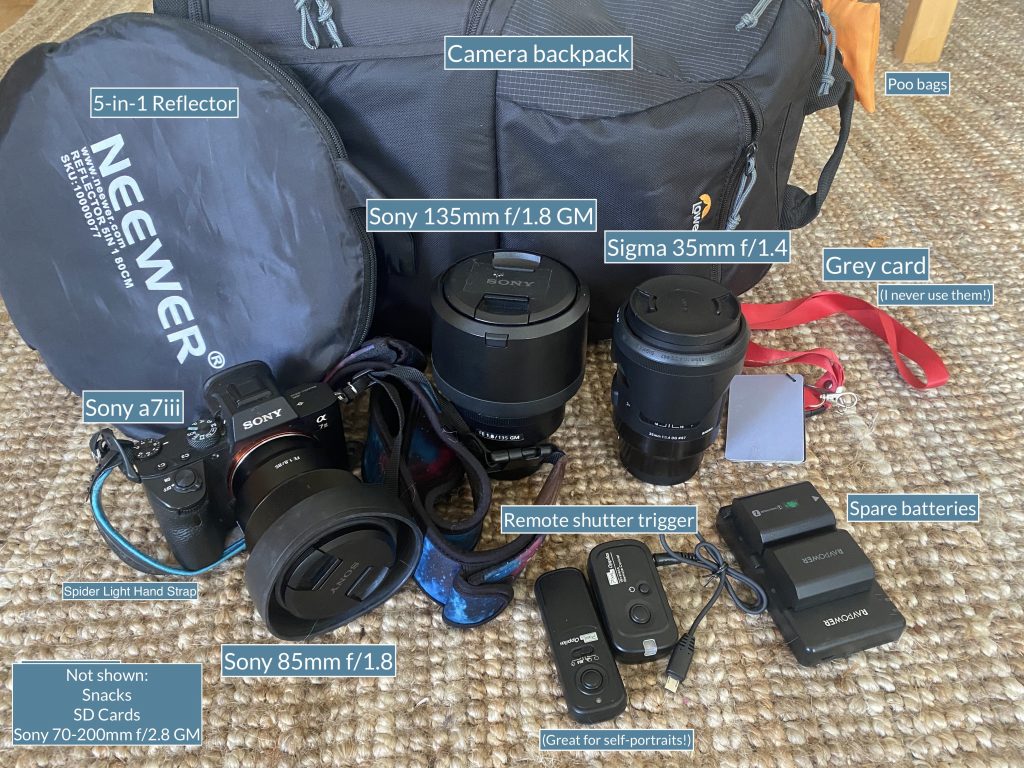
The Camera Backpack
A specially designed camera backpack is one of the most useful pieces of photography equipment you will ever own. With specially crafted compartments, you won’t waste hours rummaging for that lost lens cap, or worry about your equipment smacking together while you trek to that perfect shoot spot. I’d always recommend going the extra mile and making sure it’s a waterproof bag too, so you’re never caught out with expensive equipment in the rain!
My Pick – The Lowepro Fastpack BP. This is the one I use and I love it. Not only does it have a light and comfortable feel, but it’s also a great option for protection against the elements. With lots of room for drones and lighting if you want to get experimental. Plus it has a big pouch at the top for some all-important accessories…which we will get into later on!
Top Tip – Camera equipment is heavy! And if, like me, you have a sensitive back that gets sore easily, I recommend trying a supportive camera bag. It also means things are fairly out of your way so you can manouver around easily without a bag dangling around in front of you.
Now let’s jump into the essential pet photography equipment I take with me on my shoots!
1. Camera Body
Of course, you won’t get far without your camera! I tend to recommend that my students look for a body that suits their needs & capabilities. For dog photography, the best camera is usually something between a sports and a portrait camera, depending on your creative goals.
My Pick – The Sony A7iii. Ah, my trusty A7iii. I really love my little camera. It’s not super heavy and is small enough to pack easily, plus it has amazing low-light capabilities and a really dynamic range. It’s a winner!
If you want more camera recommendations, check out my post – The Best Cameras for Pet Photography. Or if you’re looking to invest in some gear on a budget, here’s some Top Tips for Buying Secondhand Camera Equipment.
2. Hand Strap
I love a hand strap, because it allows me to hold my camera easier and takes some of the weight out of the equation, which means I’m not going to drop it. Now that’s essential!
Plus, I find it’s super helpful for being able to use my left hand to get the dog’s attention, as some of the weight is then taken into the strap rather than having to grip the weight of the camera & lens in my right hand alone. This can really help to get those expressive shots of the dog looking to one side that I love.
My Pick – The SpiderLight Hand Strap. This strap is my top choice, because it ticks all the boxes. It allows me to hold the camera easier, supports my grip & keeps the camera safe from accidents. This one is just for mirrorless cameras – you may need the other version if you have a heavier DSLR.
3. Shoulder/Neck Strap
Another essential that makes shooting more comfortable for you, and safer for your camera!
I like to find one made in a nice soft neoprene, long enough to allow some freedom when shooting, but that’s also got some stretch. Usually, the ones that come with a camera as standard I find are too restrictive, so I prefer to use these more adaptable versions.
My Pick- USA Gear Trueshot, Neoprene Shoulder Strap. This one ticks all the boxes I mentioned above AND it comes in these gorgeous designs that add a bit of personality to your kit. I recommend the Galaxy style – so pretty.
4. Lenses
I like to bring a mix of lenses, to give me lots of options for finding the right depth & precision with my shots. Here’s my top picks that are always by my side, and how I use them:
- For Action Shots – The Sony 70-200mm f/2.8 GM. This one I tend to use for more “moving action”, or even unplanned action if a pooch is having too much fun galloping around to stay still (here’s looking at you Journey!). It’s also great if you are photographing a dog sport, like herding or agility. However the sharpness isn’t as on point as some others on this list. It’s a heavy beast so I tend to only bring it along if I know I’ll need it. Lots of pet photographers (looooooots) use a 70-200mm f/2.8 as their main go-to lens because it’s versatile and creates beautifully soft backgrounds.

- For “Puppy Dog Eyes” Shots – The Sigma 35mm f/1.4. This one has a bit of a different perspective/feeling than any of the other lenses and is great for capturing those close ups and catchlight in the eyes. I love to use it for those looking down from above shots.
- For Every Day Hikes & Test Shoots – The Sony 85mm f/1.8. This one is small, light & easy to use, but still really good quality. It’s got good compression, meaning you don’t have to be a million miles away from the dog, but can still get that lovely foreground and background blur with the dog tack sharp. This lens practically lives on my camera, unless I’m doing a specific client shoot. That’s because it has some chromatic aberration/fringing, and while the quality is really really good, it doesn’t compare to the heavy hitter of the group…
- The Heavy Hitter – The Sony 135mm f/1.8 GM. This lens is a beast – literally. It’s heavy, but it’s worth its weight in gold. But due to its weight it isn’t on my camera unless I’m feeling fancy, because the quality and sharpness is INSANE. It has beautiful bokeh & a really narrow depth of field (giving that stunning ability to create a blurry foreground and background.) But you do have to plan your locations more carefully when using this heavy hitter, because there’s SO MUCH distance between you and the dog when you use it. So getting bits of foliage as a crazy blurry haze in the foreground can sometimes be a bit of a problem.
Top Tip – If you are a hobby photographer or new to the game, you probably don’t need a heavy hitter lens like this, even though it’s breathtaking. It’s a bit like a sword…expensive to get, difficult to wield and unhelpful in inexperienced hands. (I’m acting like I know what a sword costs…I don’t. It’s just a good metaphor, ok!)
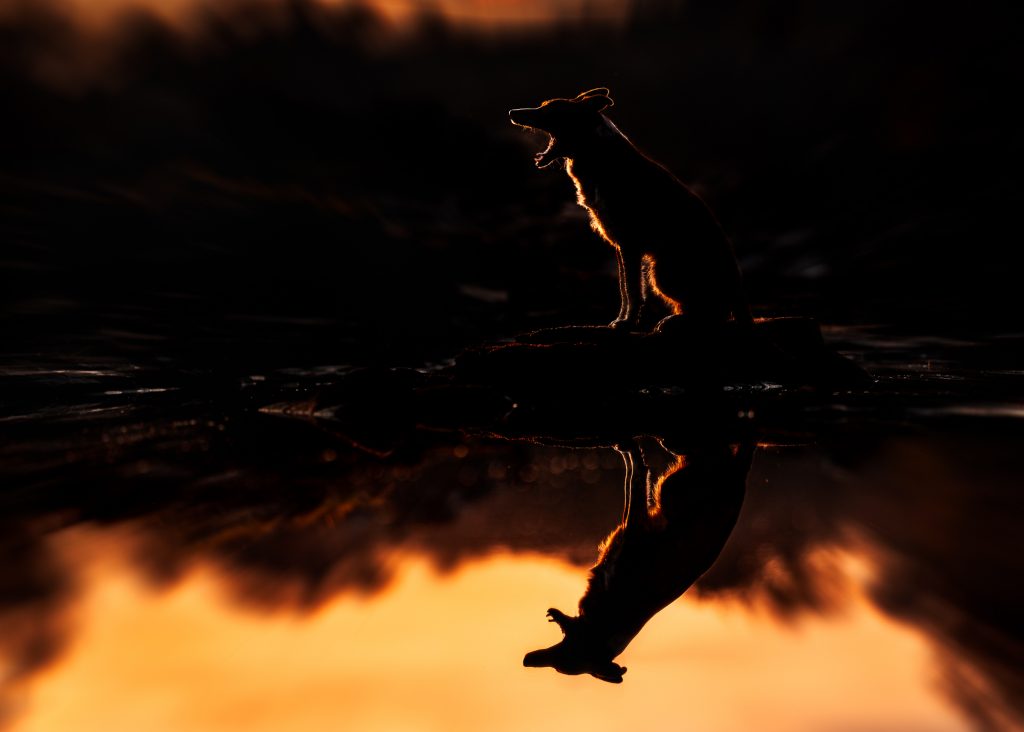
5. A Wireless Remote Trigger
This nifty piece of kit lets me set up the camera somewhere (usually on a tripod, or on my camera bag) and take self-portraits. Because who doesn’t love a self-portrait with their pups!
I also used it for some of those reflection photos with my boys (for example), when I wanted the dogs to look to the side but was on my own. For shots like this, you do really have to put your trust in your Autofocus system, but (in this example) since they were really the only thing in the scene, and far enough away that the depth of field was relatively wide – it worked out!
6. The Accessories
There’s so much more to pet photography than just the technical equipment, (but it’s a great place to start!). To feel prepared and free to explore your creative expression, there are a few key things I make sure are in my camera bag on every shoot.
- Spare Lens Caps – These small caps tend to get lost amidst the hustle and bustle of a photoshoot, so buying a few & carrying some extras in your camera bag is a good idea, unless you have a dog like Loki who can sniff them out when you inevitably loose them (no kidding. He’s found my lens caps more than once).
- Extra SD Cards and Batteries – Because sometimes you can swear you packed/charged that thing and magically it isn’t there come shoot time!
Top Tip – You could even invest in a car charger for your DSLR batteries. This way you’ll never be caught without power.
- Spare Loop Leash – In case you need to get your subject under control briefly for any reason, these are great to have on hand in your camera bag. Thin black leashes are especially useful as they’re super easy to edit out later!
- Raincoat – Because I’m in Europe right now and rain is basically a given at some point. We love it, it’s atmospheric and makes for dramatic shots. But we only love it when we are prepared for it 😉
- Water – Because you can’t be 100% on your A game if you aren’t hydrated, and neither will your subject.
- Snacks – Especially if it’s a long shoot. Because nobody does good work when they are hangry!
- Props – Maybe a winter hat for that cute Christmas card, or a frisbee for the perfect action shot.
- Treats – Because no dog does good work when they are hangry…or when they are just feeling a bit lazy.
- Toys – Sometimes these can help to perk up a dog’s expression, or motivate them to repeat an action.
- Poo Bags – Ofc.
The Optional Extras
These are some common extra items that many photographers carry in their camera bag. Personally, as I often work solo and in wild terrain, I like to keep my bag streamlined and light, but these might be of interest for your kit bag if you want to experiment or hone your style.
- Camera and Lens Cleaning Kit – Pet Photography can get messy, there’s no doubt about it! So it can be useful to have some cleaning supplies to keep your kit looking top notch.
- Grey cards – I occasionally use these on my shoots and they come in pretty handy! A tool to help you set the correct white balance in editing, by taking a photo of them then using them as a reference in Lightroom.
- Tripods – I mostly prefer to use my hands rather than a tripod, but for a specific idea or shoot (like the reflections shots) they can come in super handy.
- A 5-in-1 reflector – Now and again, I’ll use these to bounce light onto the side of a dog’s face. There’s an example below of using one of these on Loki’s face, which was directly facing the ground. Since the ground produces no light, he had no catchlight in that eye, and no light on that side of his face at all. By positioning the silver reflector to bounce light from the sky above onto that cheek, I managed to get a lot more detail and light back onto his face in editing. With and without the reflector, you can see how dark his face was without it. So they can be useful in moments like that, but it’s not very often I find myself reaching for one.
This is before using the reflector (phone photo) 
This is after using the reflector (phone photo)
- Towels – These can come in pretty handy as a place to put your gear, a tool for wiping off drool and cleaning furry coats, or creating a comfortable seat for your subject on potentially uncomfortable scenery. Microfiber ones are great as they dry quickly and are super lightweight.
So there you have it! I hope this pet photography kit list helps you on your next shooting adventure. Plus, if you fancy, why not share your own what’s in your bag with me? You better believe I can’t wait to read it. (Addicted!)
If you want to learn more about using your kit to its full potential, setting up the perfect scene, or even just how to take better pictures in your backyard – I’d love you to check out my online pet photography courses.
They’re built around having fun whilst developing your photography skills and exploring your creativity, and there really is something for everyone – no matter your current experience level. I’d love to meet you there!
Happy Snapping (or packing?) 🙂
This blog post contains affiliate links. I receive a small kickback from clicks and purchases with no added cost to you. Woo hoo!

Pingback:Must-have accessories for stunning pet photography