ArchivesPhotoshop Course

Content Aware Fill

Content aware fill is a great tool for removing things from the scene. Photoshop analyses the photo & area around what you want to remove, and fills it in with what it thinks would be there.

This tool is great for:

  • removing people/owner’s legs
  • removing things from the ground/background, like logs, shoes, people in the background, especially if they and the background are blurry
  • potentially filling in blown out bokeh spots
  • potentially removing a weird branch or similar

Photoshop generally needs to be able to “see” the difference between what you want to remove and the surrounding area, and it needs to have enough surrounding area to sample to create new pixels from. If the thing you want to remove is super close to your dog, expect to see the dog’s face duplicated as it attempts to fill in the area.

As with some of our previous tools,

it’s very important to check what Photoshop has filled in the empty space you filled, checking especially for

  • repeating patterns
  • incorrect depth of field

And then fixing these with another tool, such as clone stamp.

1. Get your image layer ready

Because we’re using a tool which reads and creates new pixels, we will not be able to use our smart object for this tool, because it is prohibited from altering/adding pixels.

Therefore, the first thing we need to do is create a layer that isn’t a smart object, where Photoshop can fill in the area we select and tell it to fill.

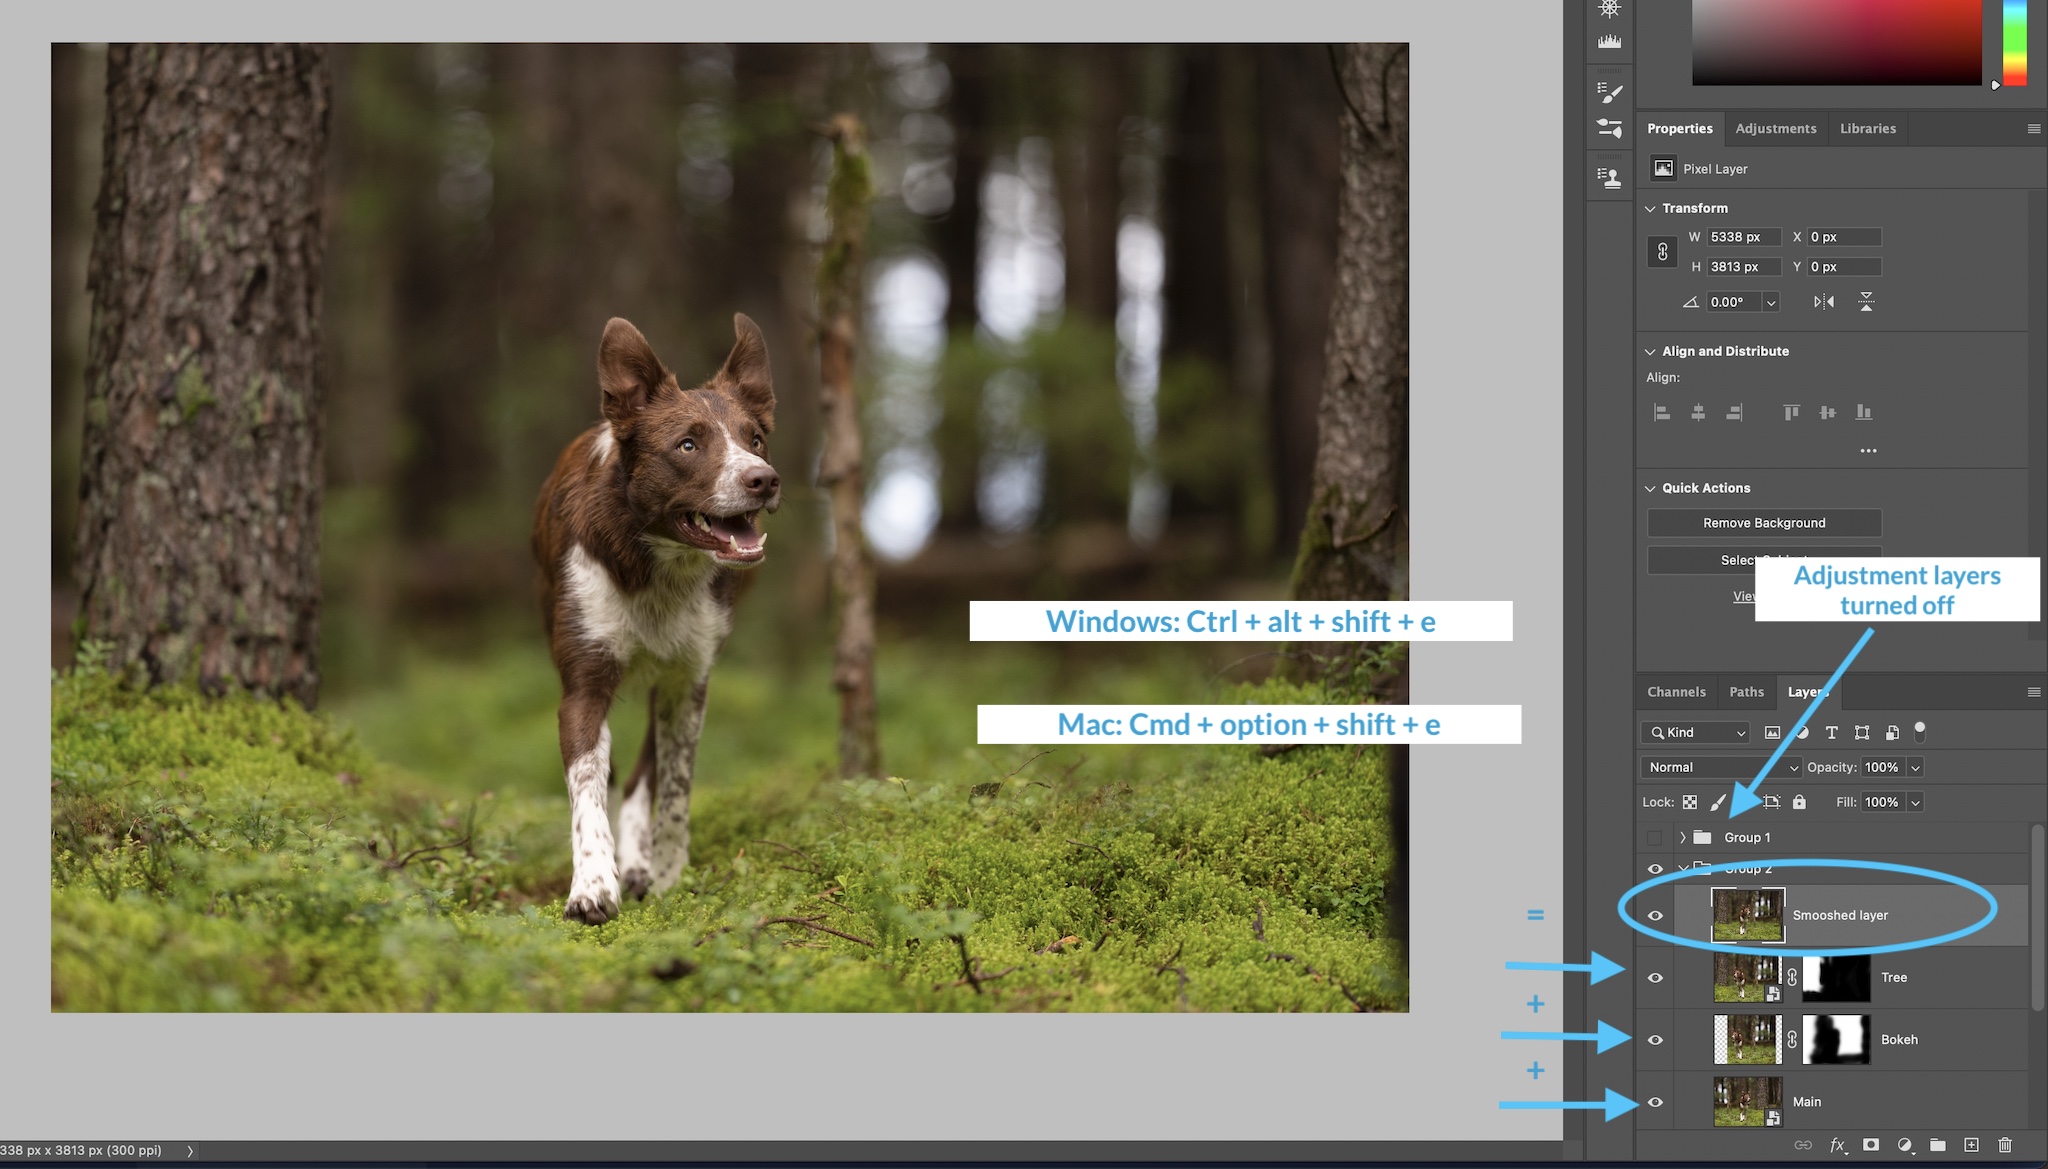
I highly recommend that if you have any adjustment layers already that you group them and click the eye icon to turn them off. 

Then, you have two options.

  1. Simply create a duplicate layer of your smart object. Right click and select “Rasterise Layer.” Or even just click anywhere on the image with your brush tool. A warning box will pop up, asking if you want to rasterise the layer. Click “ok”
  2. If you have already done some other work on the background, eg., copy/paste & flip or something where you have significantly altered the background, you may want to make a flat (or “smooshed”) layer. This layer will make a copy of all your currently visible layers, wherever you created it. Use the keyboard “shortcut”: Crtl/cmd + option/alt + shift + e

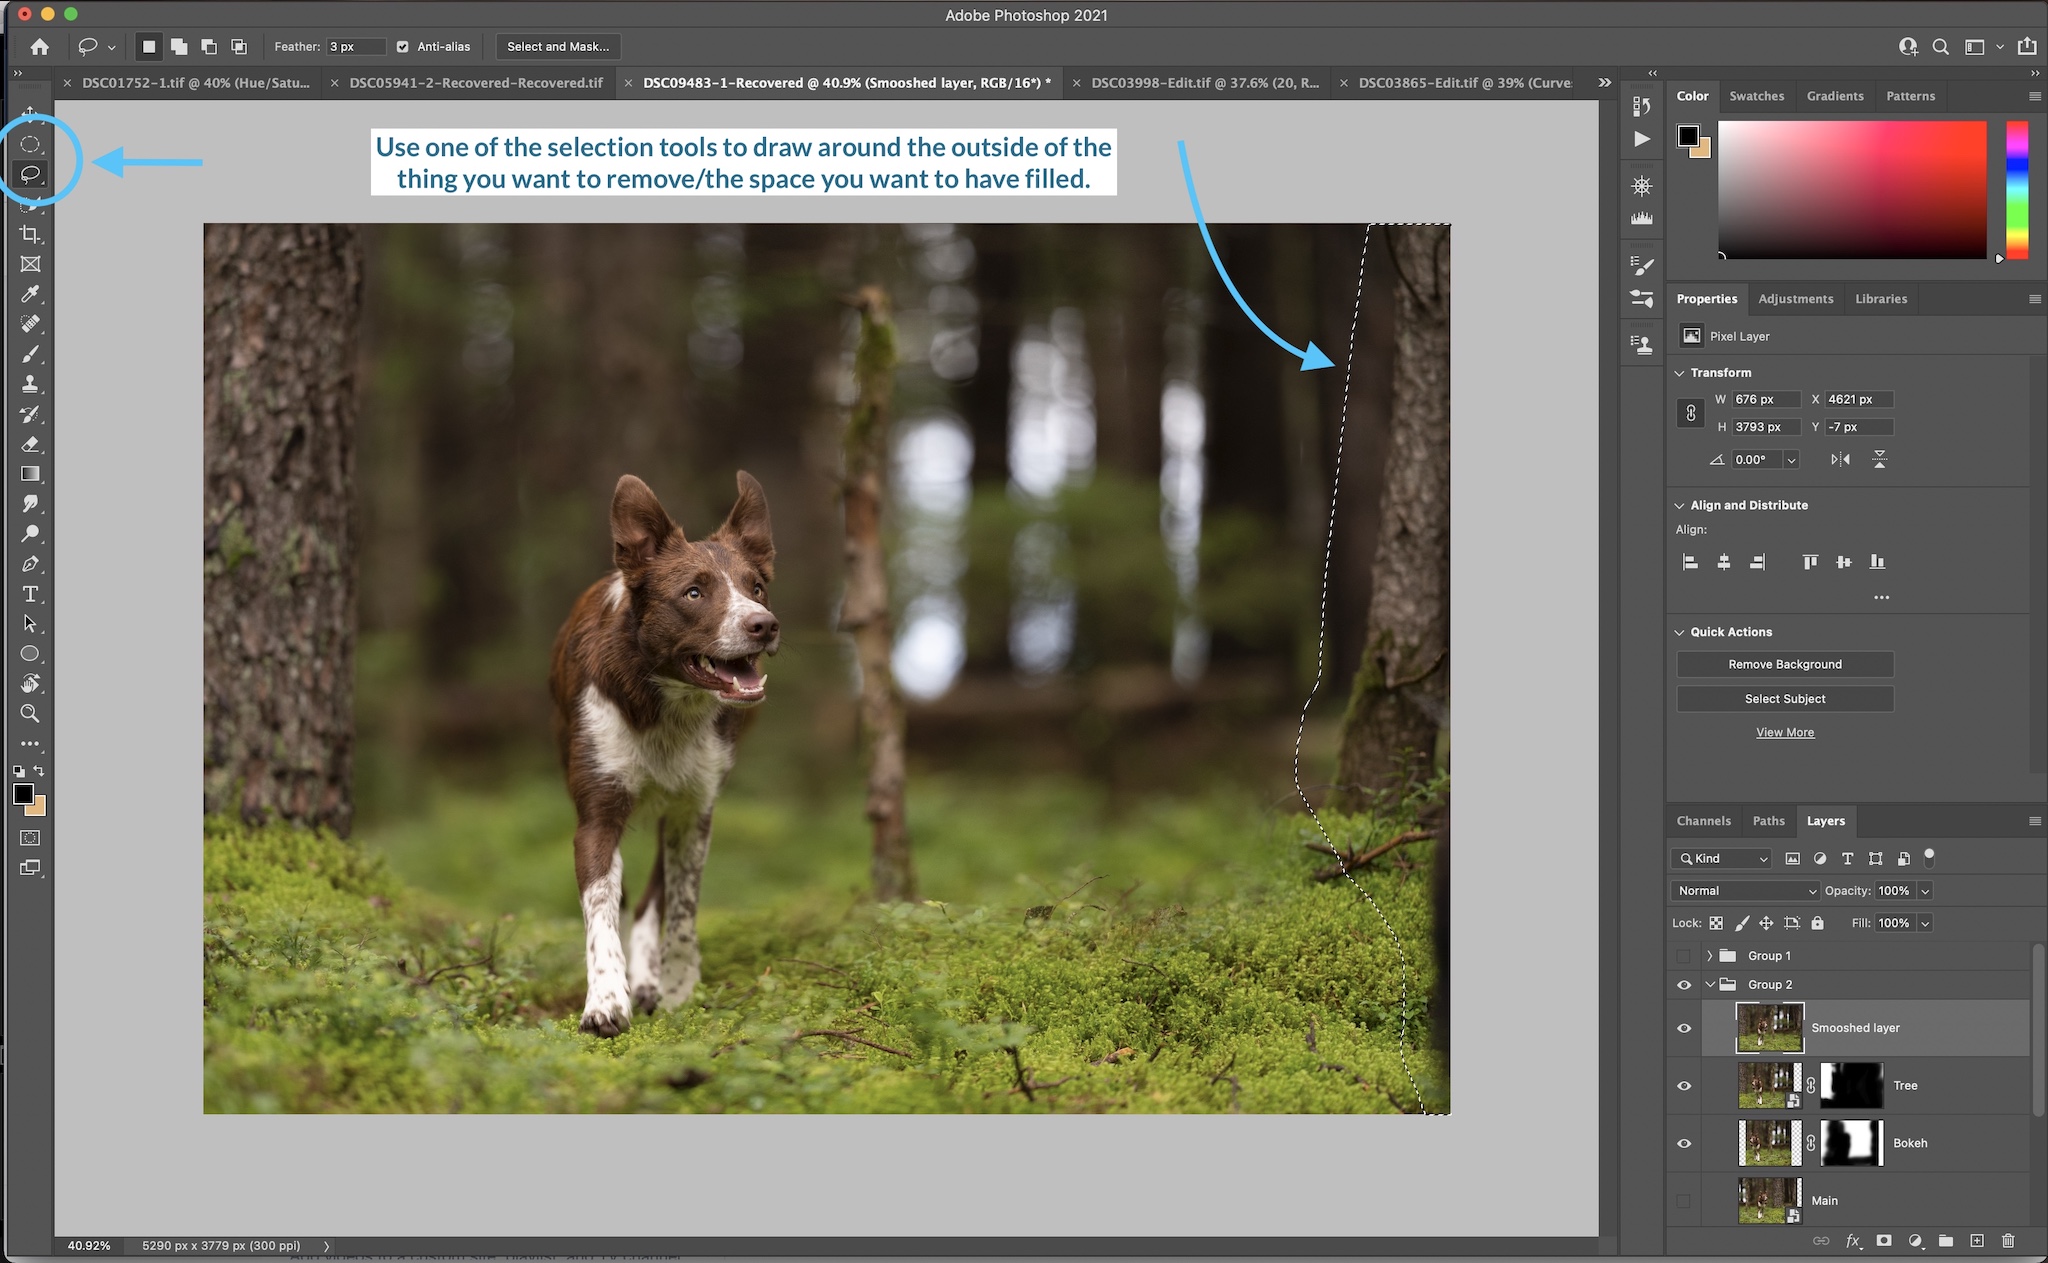
2. Select what you want to remove/fill

Use a selection tool, such as the rectangular marquee tool (M on your keyboard) or the lasso tool (L on your keyboard).

Click and drag to surround the object. In this case it can have some margin, it doesn’t have to be perfect.

3. Right click & select: Fill...

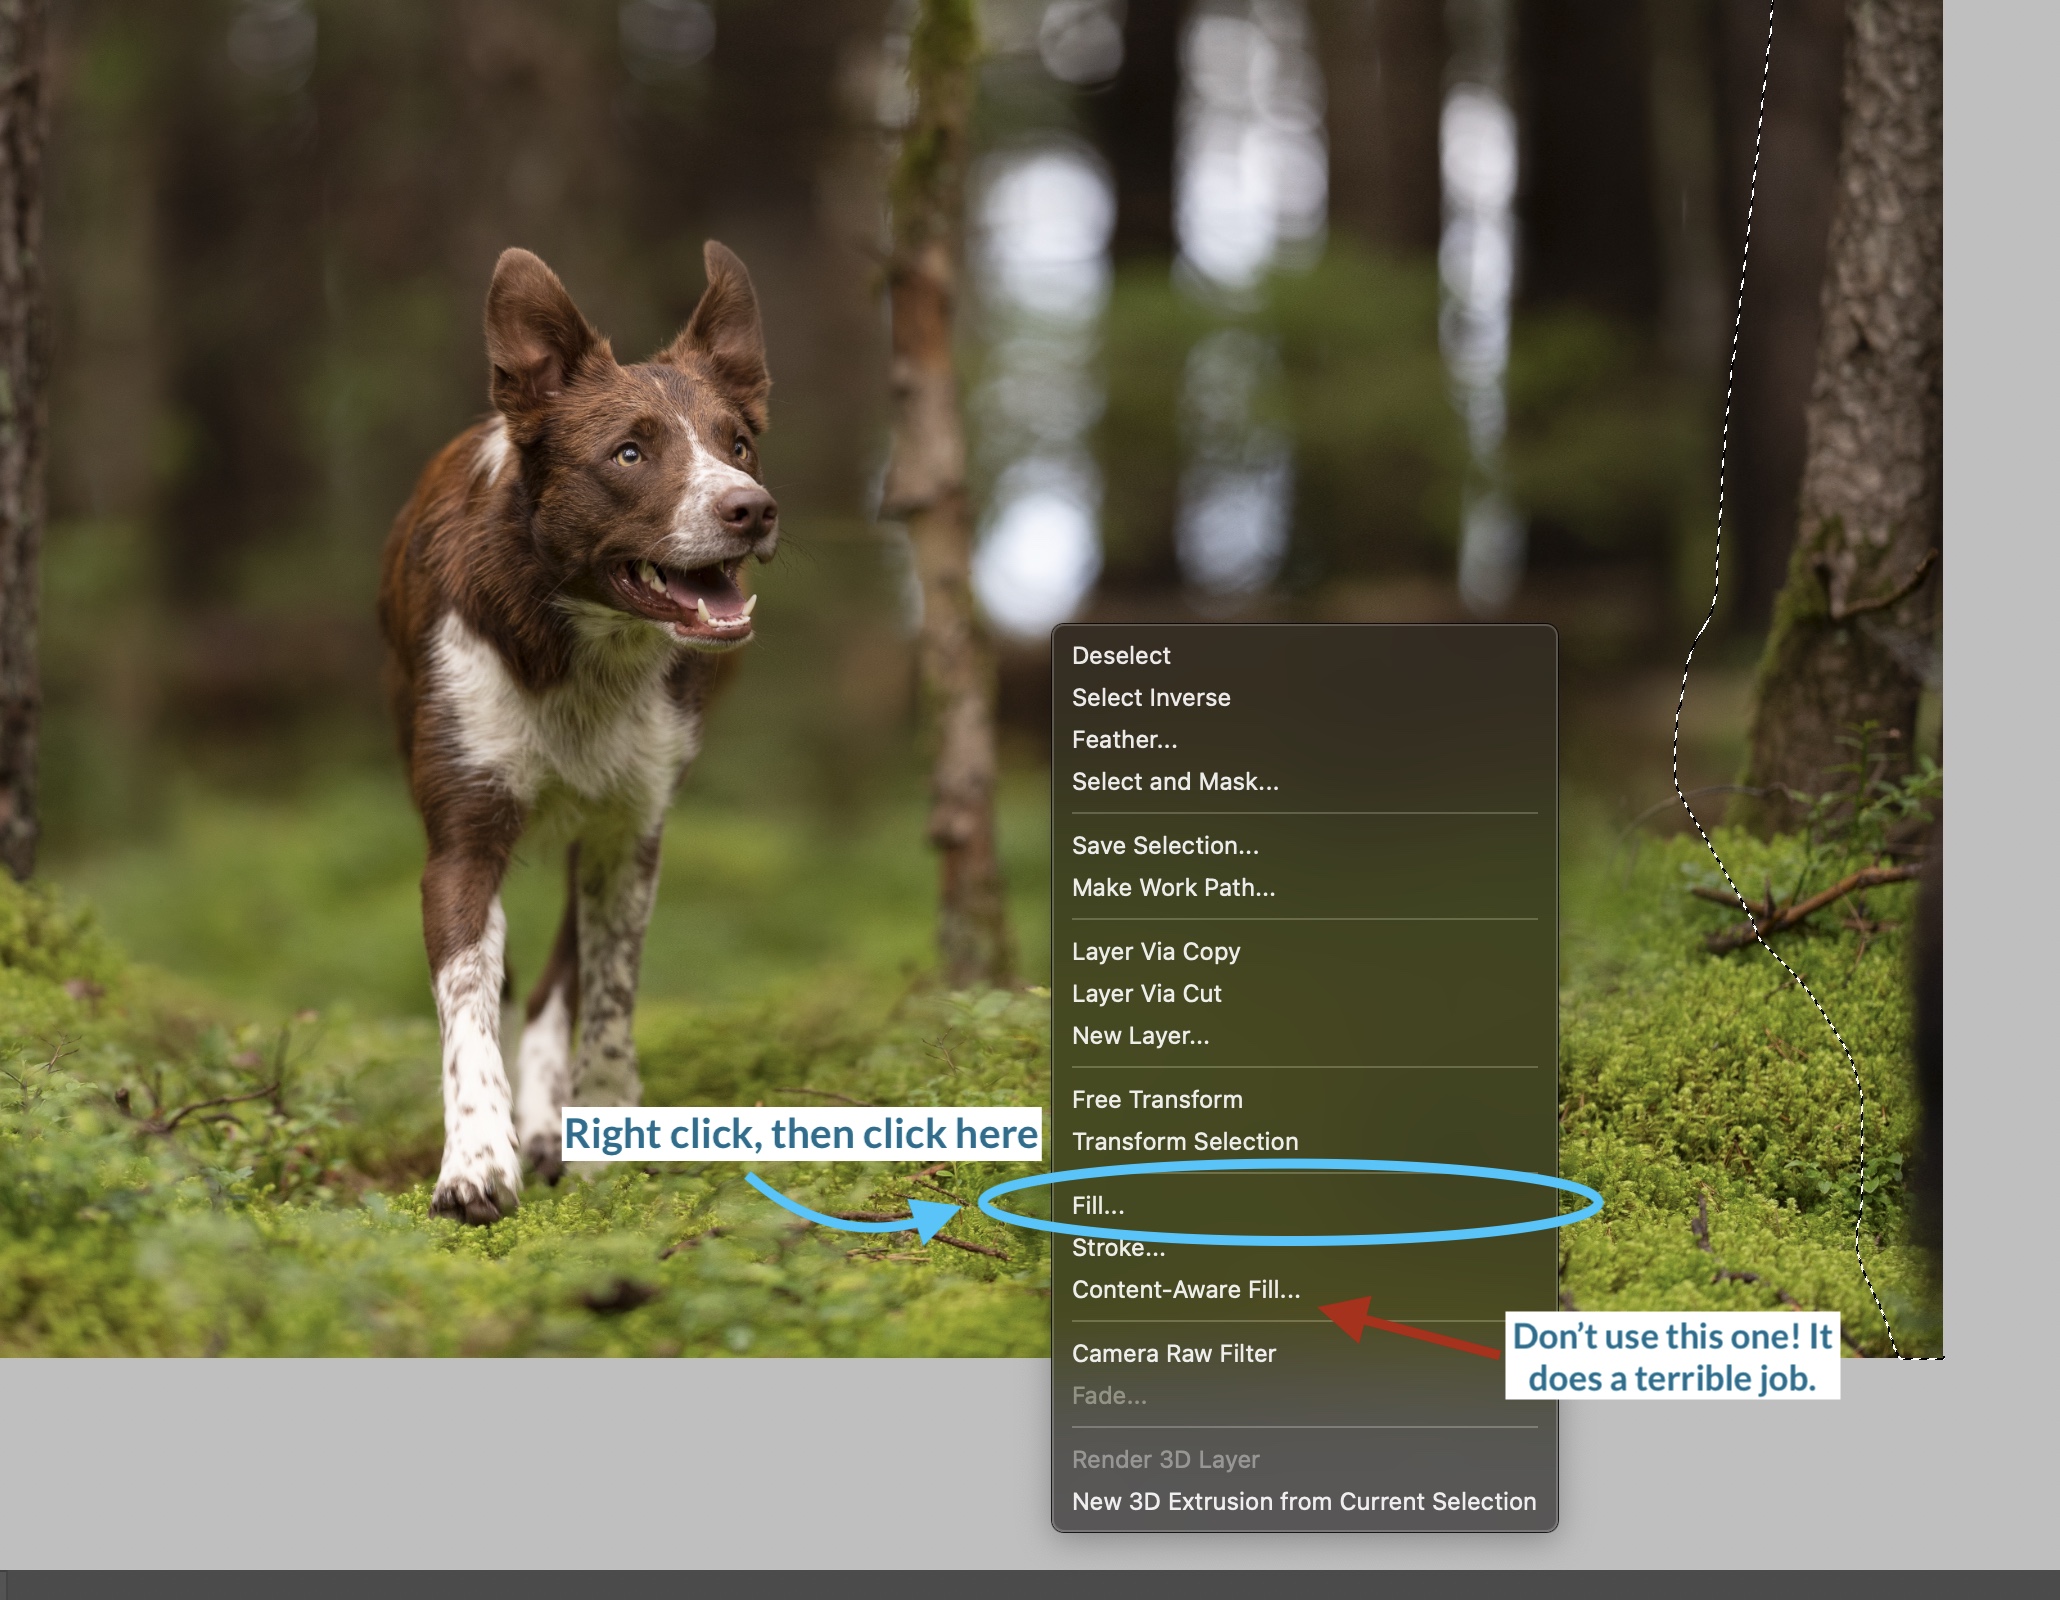
To fill this area, right click anywhere on the image, and go to Fill…

Important!! When you right click, you will immediately see a “Content Aware Fill” option. This is NOT what you want!

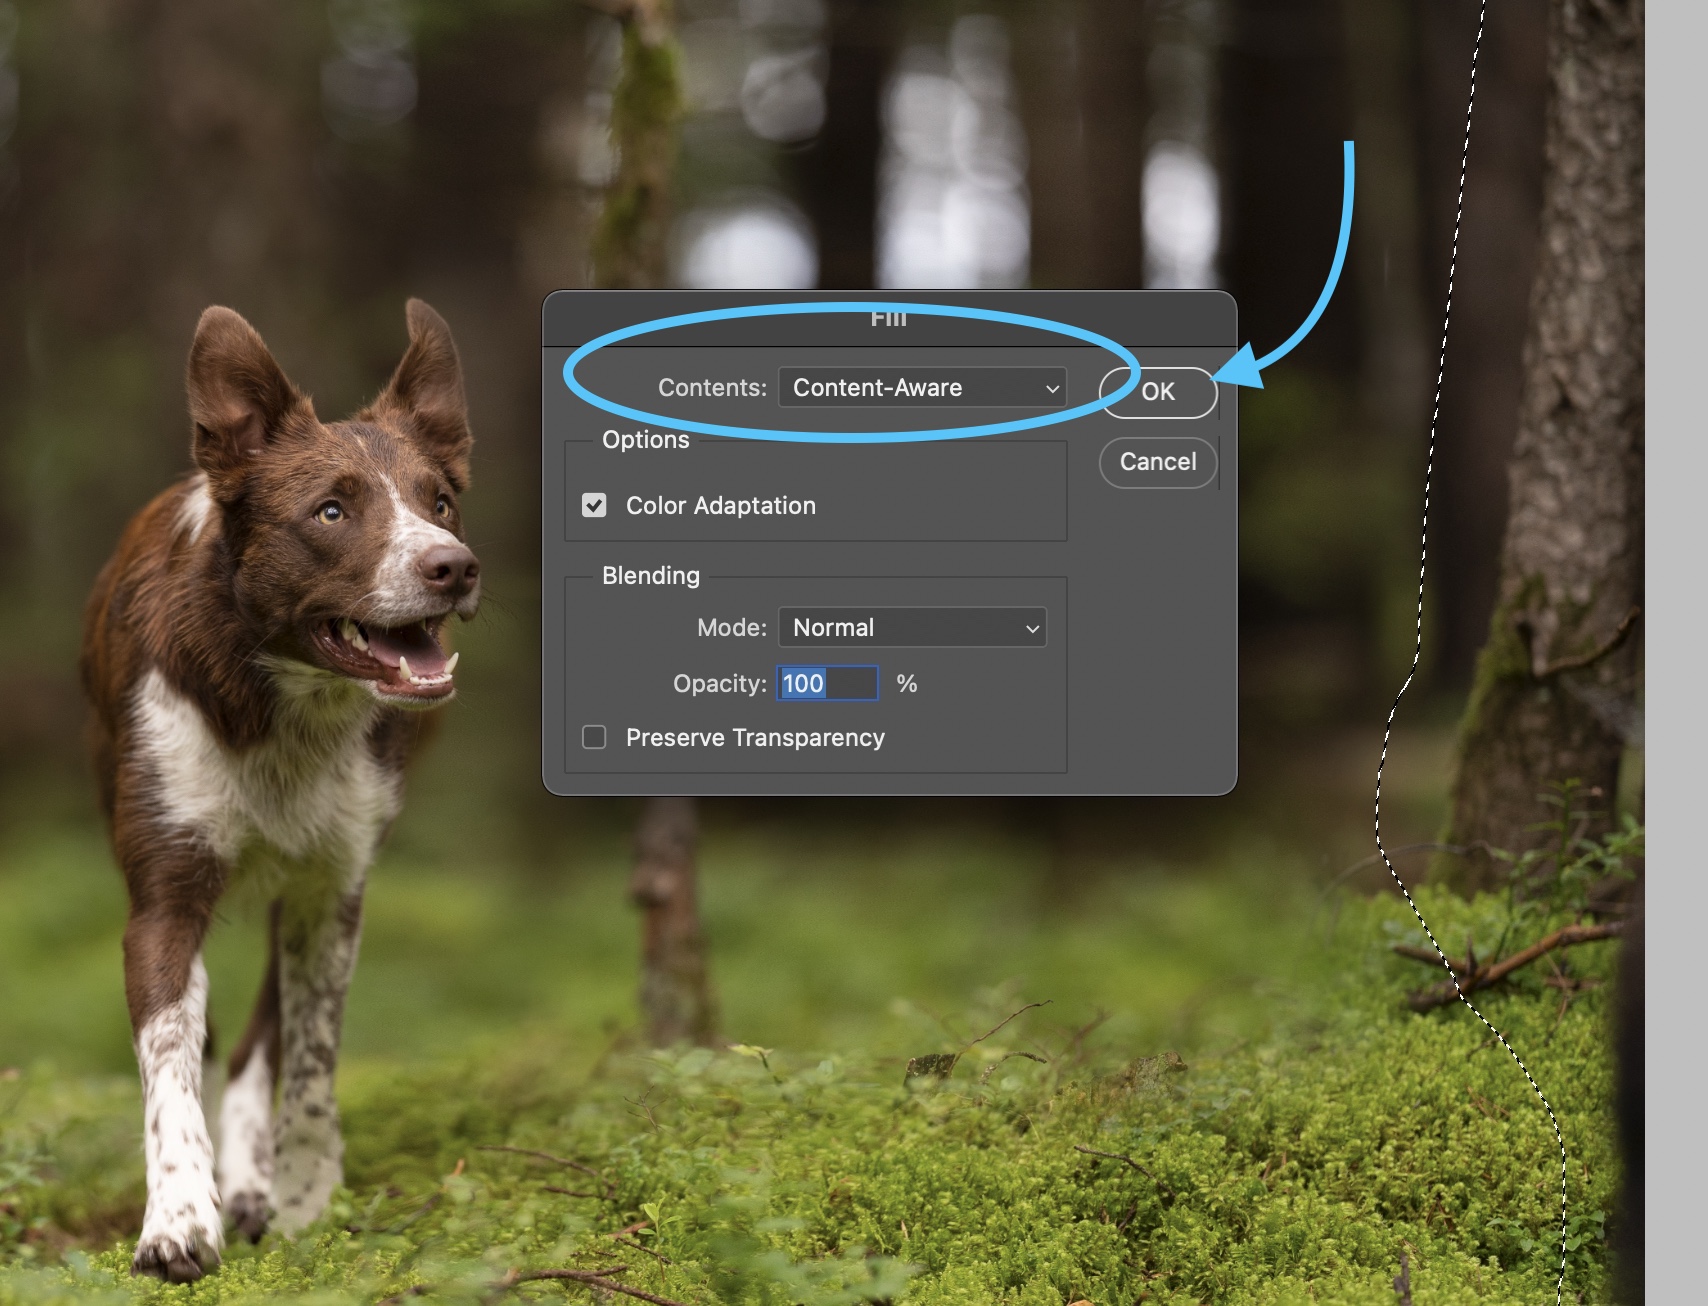
After you’ve clicked Fill… a box will pop up.

Here you can select “Content Aware”

4. Check the Result

Make sure that whatever Photoshop did makes sense. Are there repeating patterns in leaves? Is the depth of field correct? Are there any “weird” bits?

Possibly, the whole thing will be a bit weird!

Don’t despair, we can fix it using other tools.

Another option, if it really doesn’t want to work, would be to try and use the Copy/Flip method to take part of your existing scene and move it where you want it. 

If it really doesn’t want to work, there just might not be enough background margin for photoshop to read – for example if there are really busy/detailed areas, or the subject is really close to what you want to fill. 

Possibly, using the Clone Stamp might work better for you in this case, or using another part of your image.


Smart Objects

Smart Objects are a type of image layer in Photoshop. There will be a video lesson coming soon.

There are two types of Smart Object, depending on how you’re working.

  • A Smart Object which is the raw file of your original image and is the first thing you open when you bring the image into Photoshop, and,
  • A layer that you have converted into a Smart Object. 

In both cases, it’s important to note that Smart Objects are image files that are protected. We can’t alter, delete,  stretch, shrink, draw over or alter the pixels of that file at all – more or less.

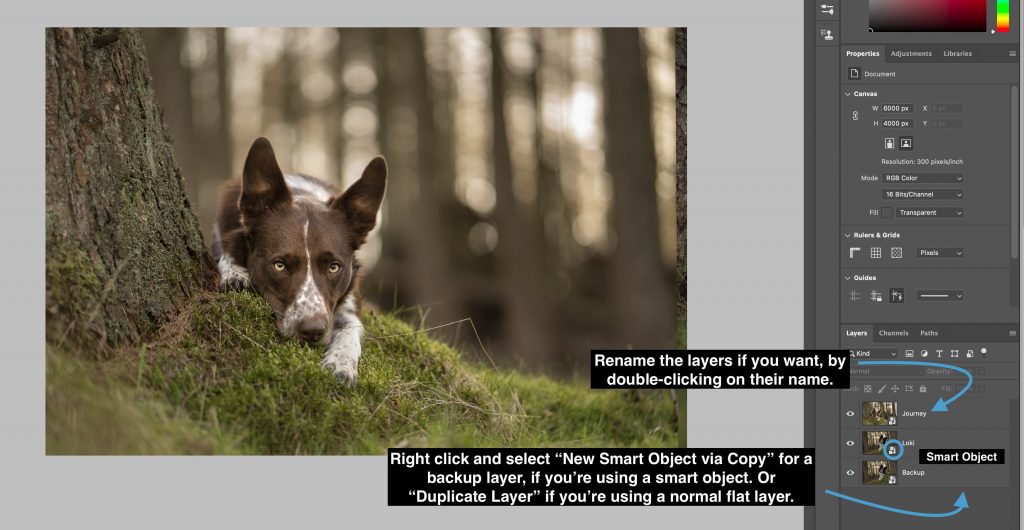
You’ll know that you’re working on a Smart Object as it will have a little symbol in the corner of the thumbnail, as seen below. This symbol will not be present for normal rasterised layers.

The best thing in my opinion about Smart Objects is:

  • when working with our RAW file as a Smart Object, we can access the edits we’ve made to the RAW file. That includes our base global edits from Lightroom or Camera Raw Filter, and selective edits we’ve done here too (like radial filters, etc). We’ll learn more about Camera Raw Filter in an upcoming lesson. But basically, it means we can access our RAW file and all its precious, precious data.
  • when applying filters or other effects, we are able to alter or change them, as they aren’t applied directly to the image itself. My motto for working with Photoshop is to try and keep your workflow as flexible and editable as possible, and working with Smart Objects can be a way to accomplish this. 

Some “cons” in regards to using Smart Objects (and how to get around them).

  • We can’t use some tools directly on the layer (clone stamp, healing spot brush etc). 
    • This is easily solved by creating a new blank layer, and ensuring “sample all layers” is ticked. You’ll learn more about this in following lessons.
  • We can’t use “Content Aware” tools on Smart Objects as they require is to change/add/alter the pixels.
    • We can create rasterised layers that aren’t smart objects, if and when we need to use those tools. That does often mean we can’t necessarily go back to our RAW file as we’ll have a new image layer on top. But sometimes that’s the price we’ve got to pay.

Don’t worry if this all seems a bit much right now – it will get covered several times as we go through the course, and the information will be here waiting for you to refer back to. 

Useful Mask Tools

Knowing some simple shortcuts and tools to use Photoshop and to do different things with your masks will make your life much easier!

There are hundreds of different shortcuts and tools, but these are the ones I use most often. Often, if there’s something you want to do be able to do in Photoshop and it seems like something you logically should be able to do, there’s probably a shortcut or a way to do it! If you don’t find the tool or shortcut in this course, be sure to also check google. 

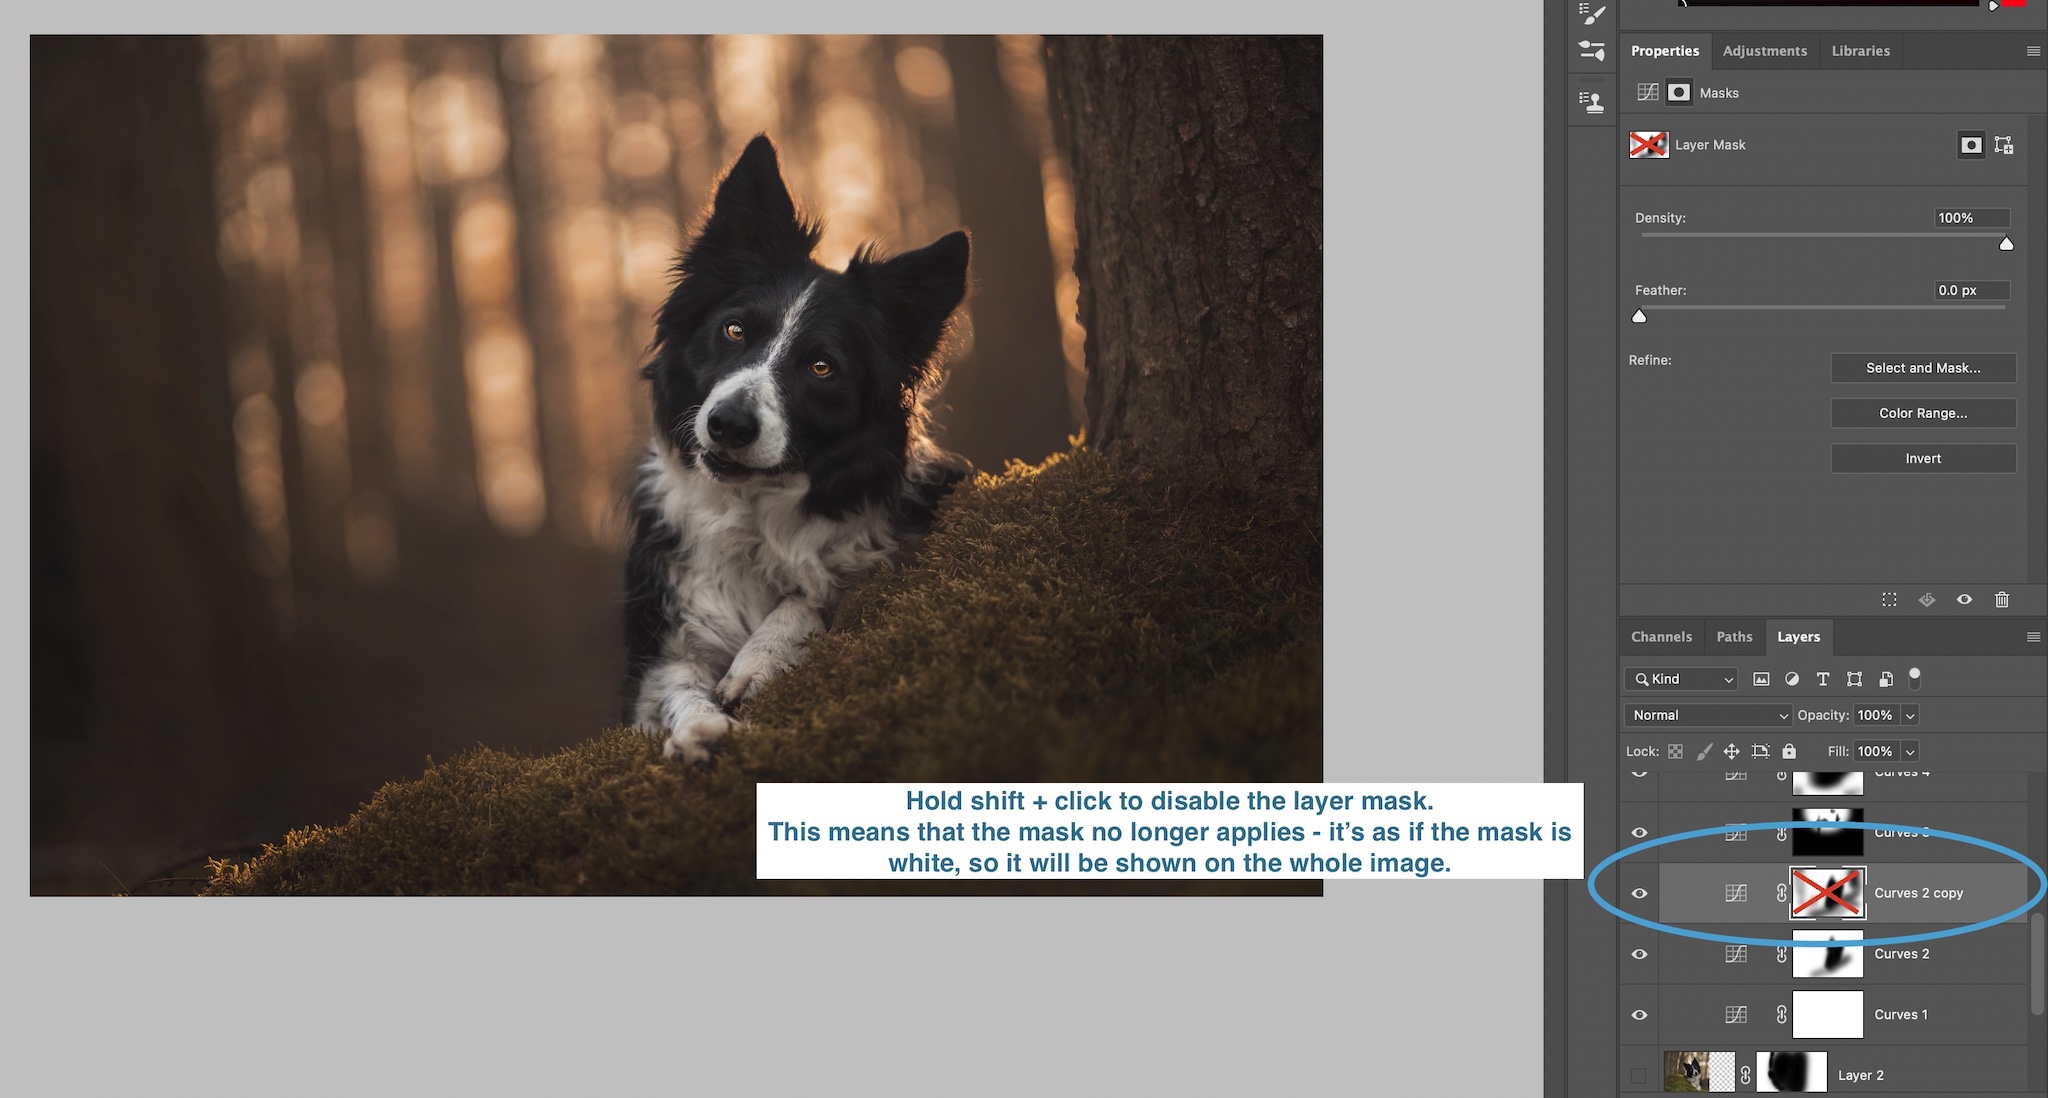
Disable Layer Mask

Sometimes we need to turn the mask off temporarily, without deleting it. To do this, hold shift and click the layer mask thumbnail to disable it.

To enable it again, just click the thumbnail once.

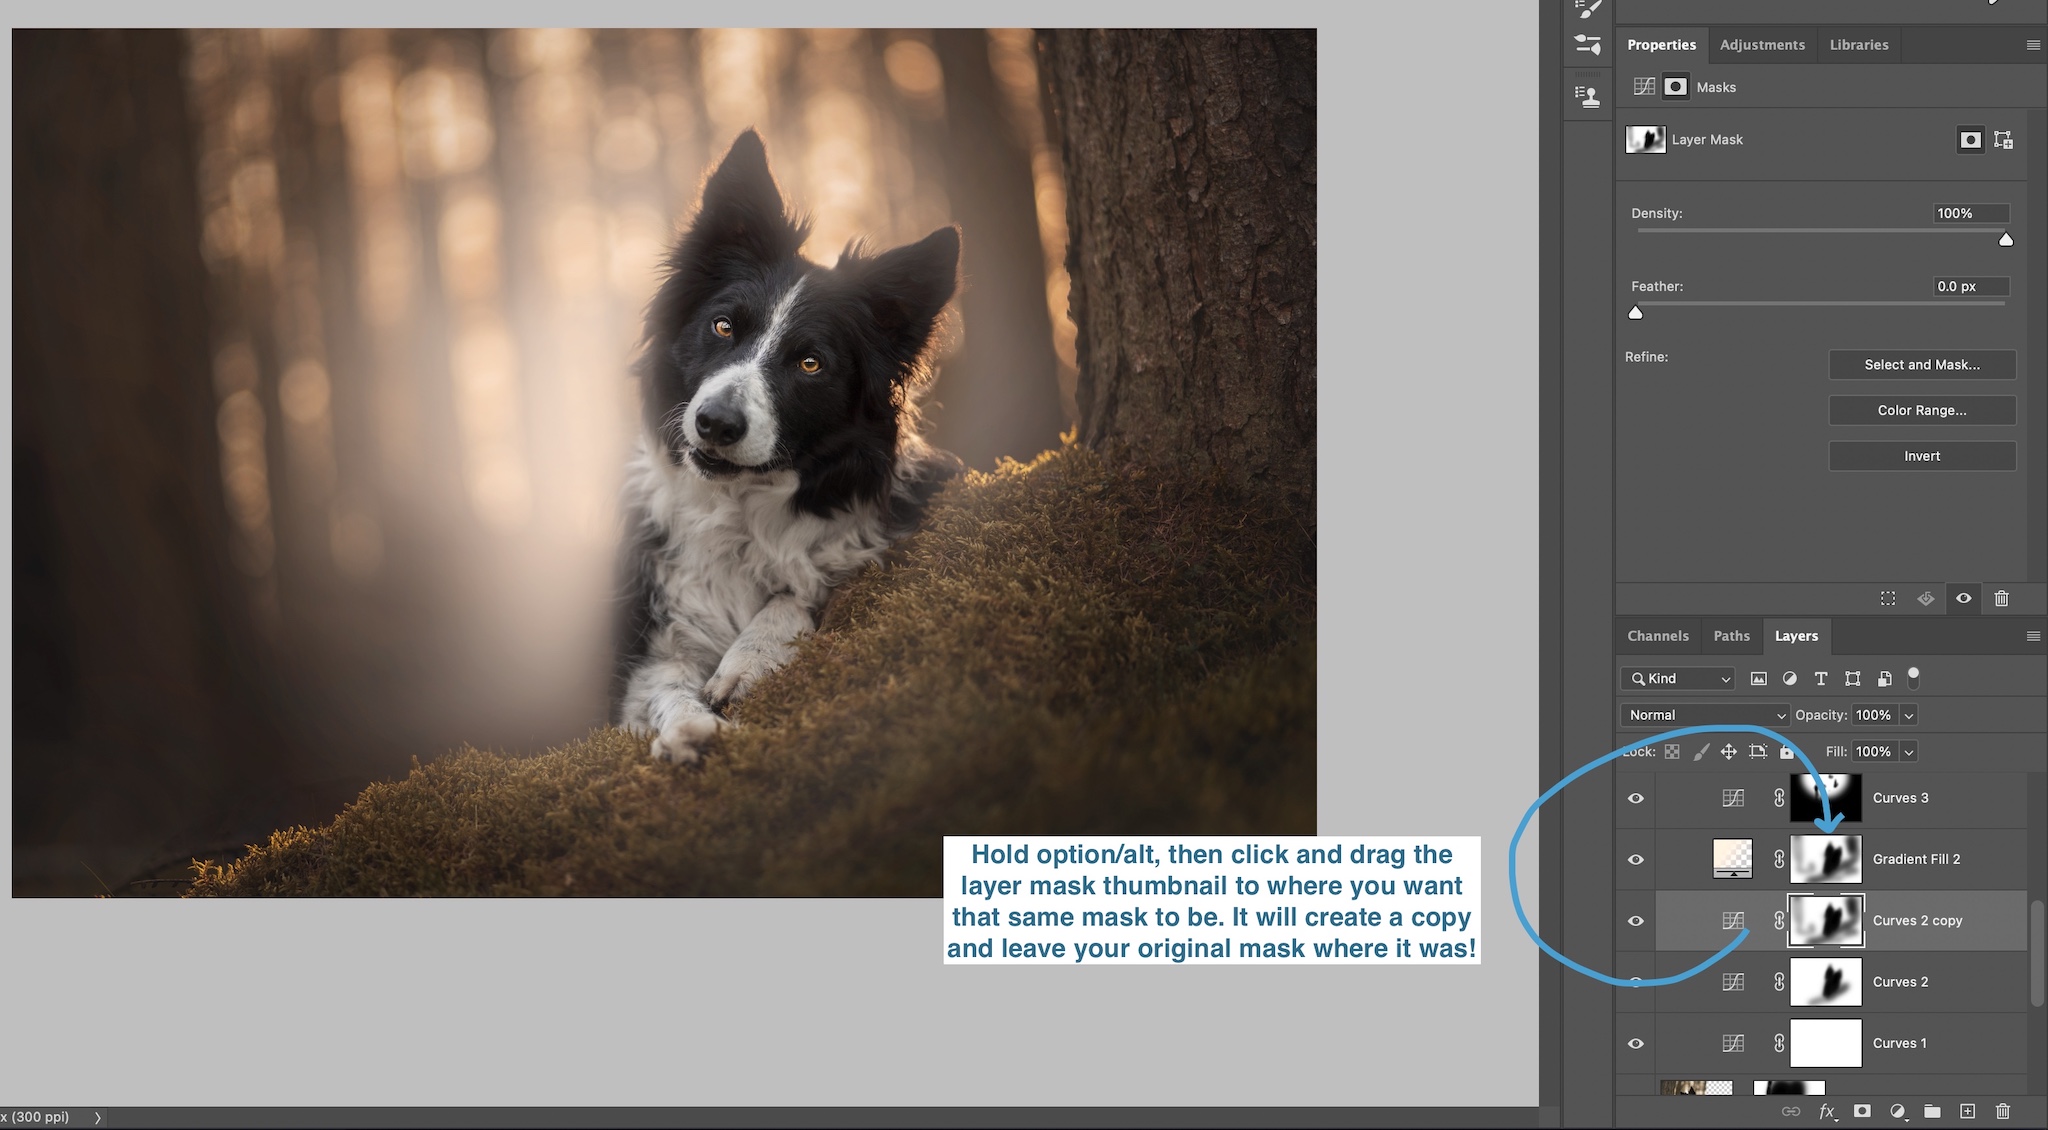
Copy Layer Mask

This will be most one of the most useful tools you have! I use this very often, though I often make changes to the mask once it’s copied. Hold option or alt on your keyboard, then click and drag the layer mask thumbnail onto the layer where you want to use that mask.

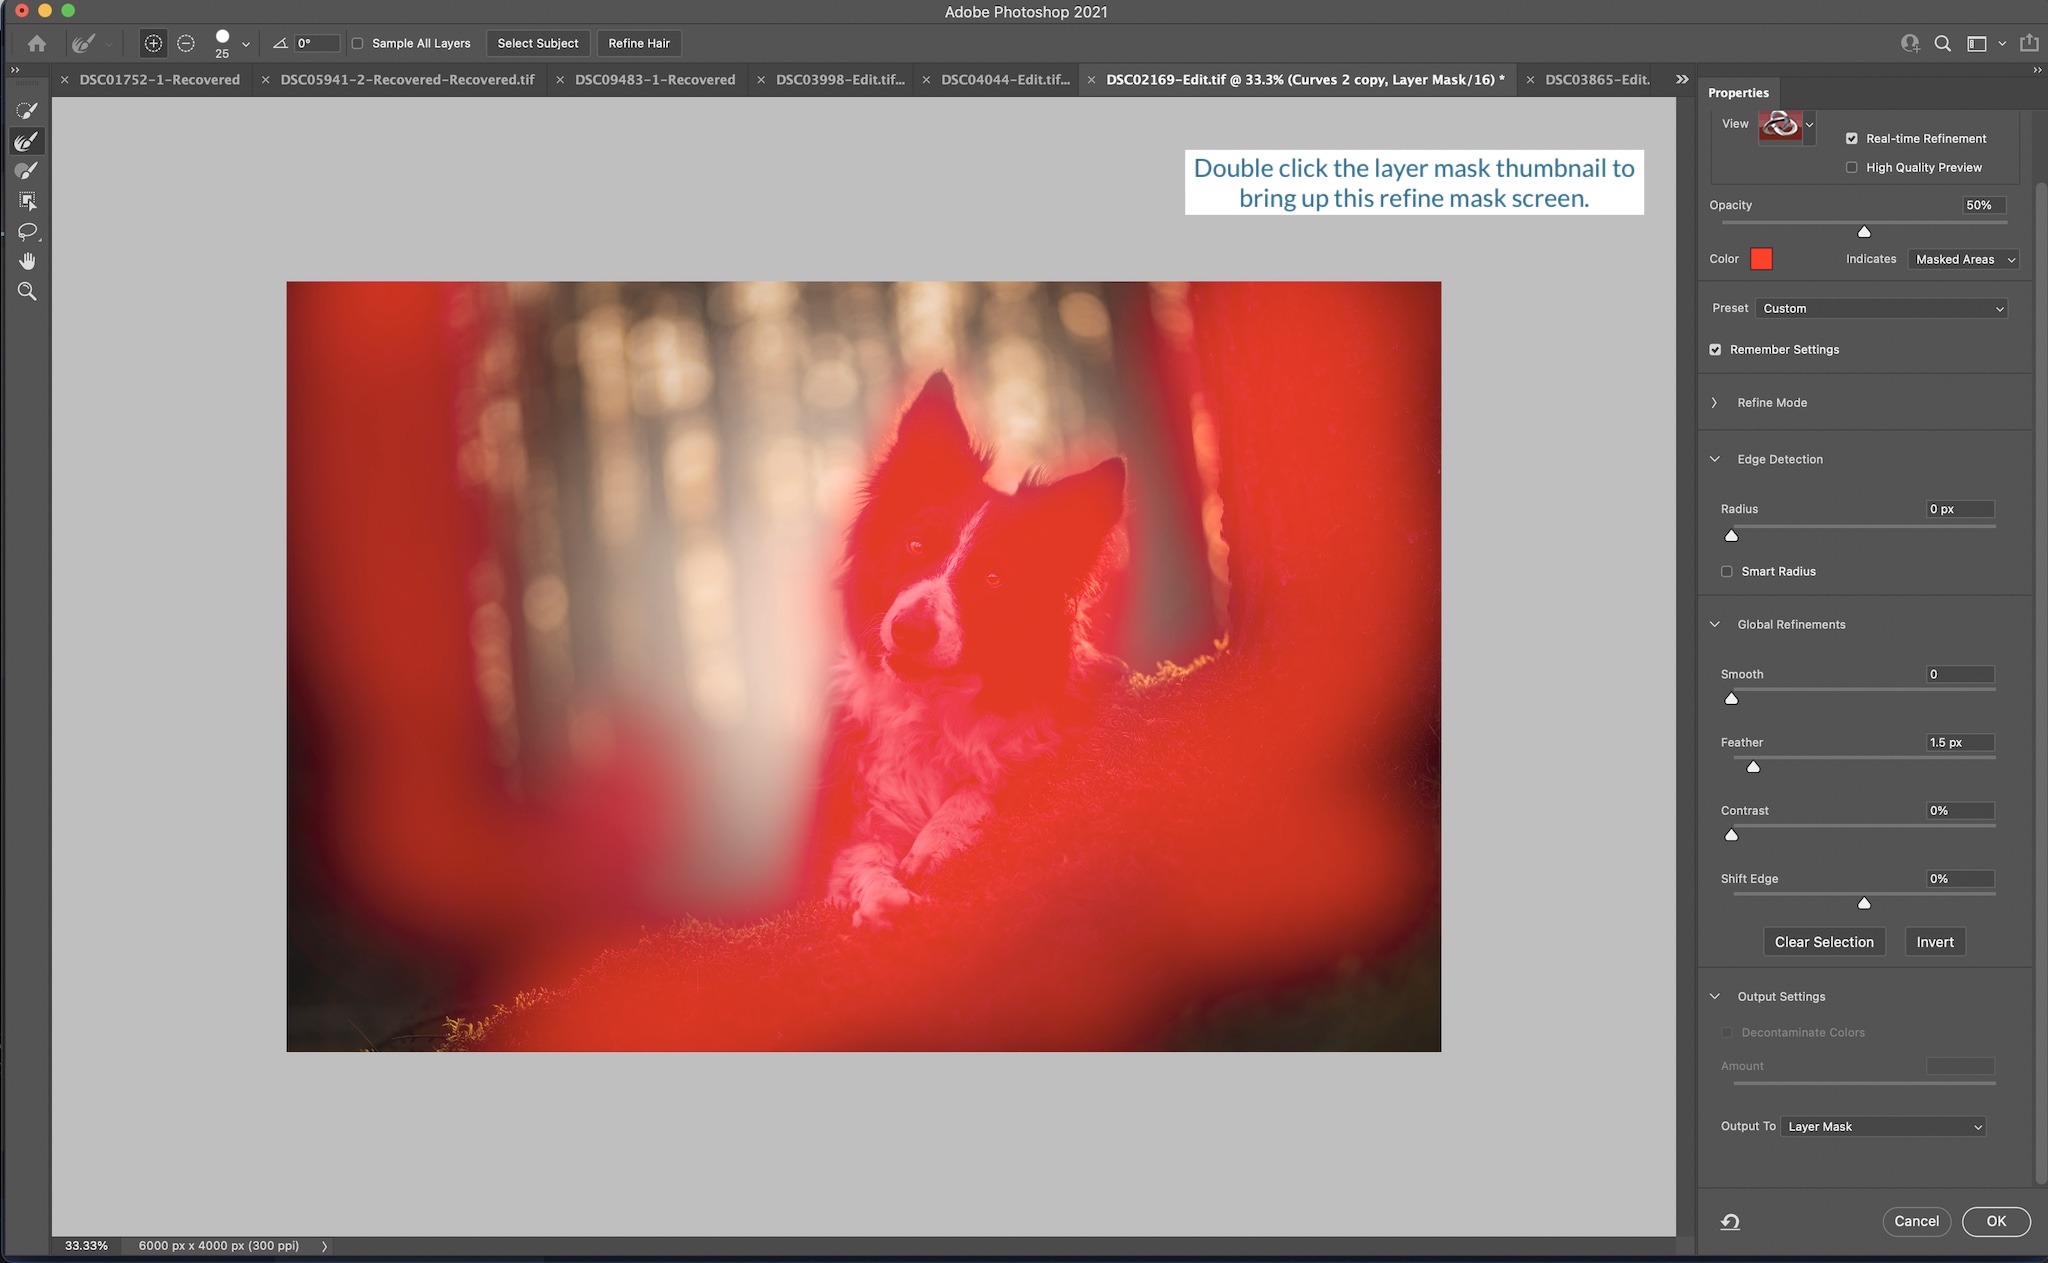
Edit / Refine Mask

If you want to just work on the mask, or refine the mask you’ve made, double click the layer mask thumbnail.

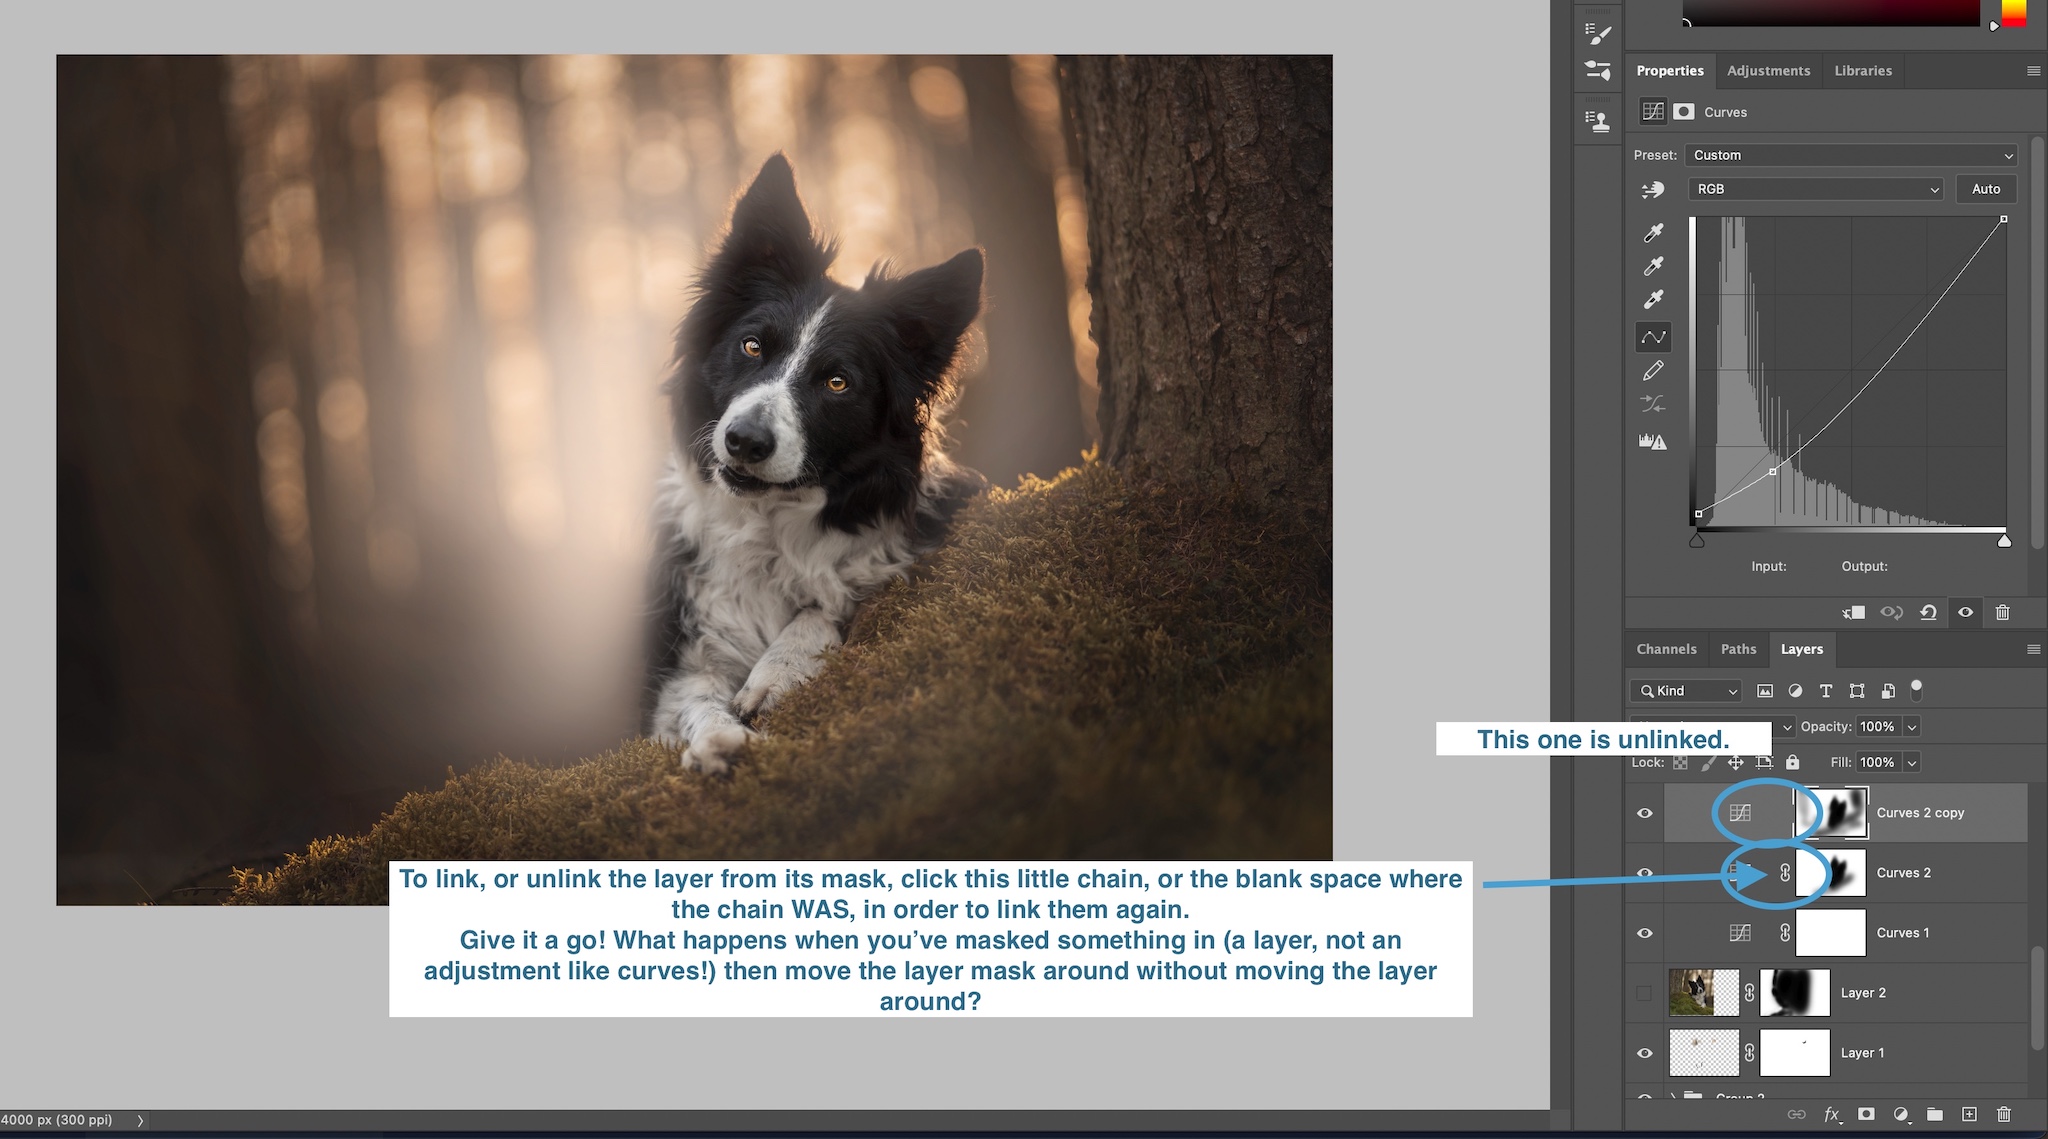
Unlink Layer from Mask

Sometimes, you’ve created a perfect mask where you want it to be… but the layer you’re masking in doesn’t fit, or you want to use a different bit of bokeh, or you need to move the image layer just slightly so it fits better. You don’t need to move the mask, just the image itself.. OR… you want to move just the mask, but not the image! 

We need to unlink the layer from the mask so we can move them independently. Although we don’t need to do this very often, it can definitely be handy to know how to do it!


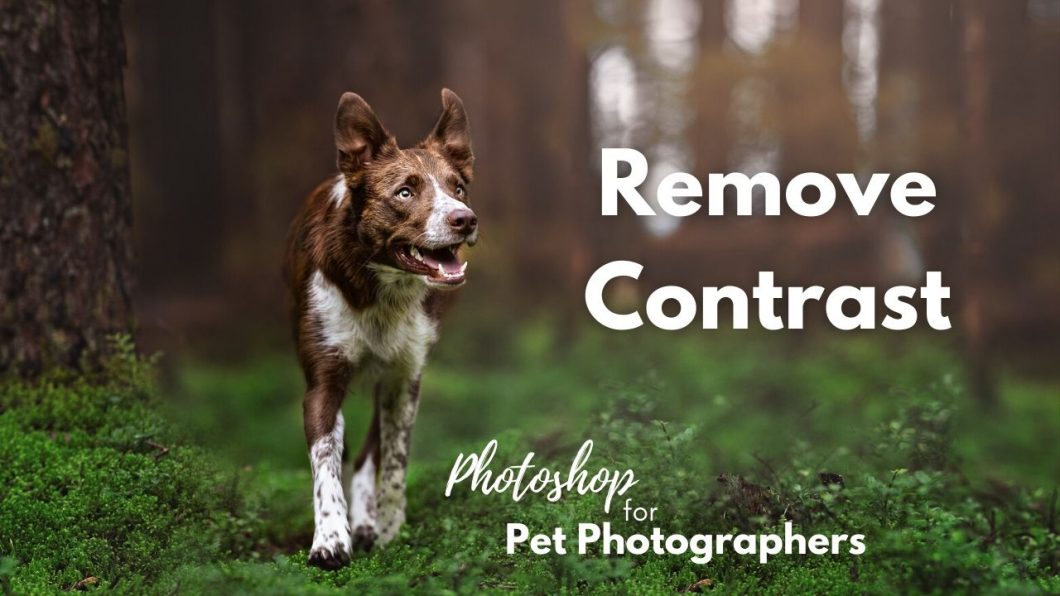
Removing Contrast

This is one method of giving the perception of a blurry/soft/creamy background, without actually adding any artificial blur. 

By removing contrast, we remove the distinction between different elements of the image, since our eyes rely on contrast to know the shape of things, and since contrast separates one thing from another (eg., a dark tree trunk in the background will stand out more when it has contrast. When contrast is removed, it will blend in to the background more.)

As with all things, I recommend using this method in moderation. It is rather trendy to have a hazy matte-effect/kind of grey background, but this often creeps into the foreground/area where the dog is positioned too, which can make them look a bit like a sticker, as they are the only contrasty thing surrounded by hazy greys.

Personally, if I’m removing contrast, I tend to brush this effect off of the areas nearest the dog, if they’re lying on a log, etc.

This method makes use of Curves Layers. If you’re not sure how to work with curves layers, jump back to the lessons on adjusting light for a refresher.

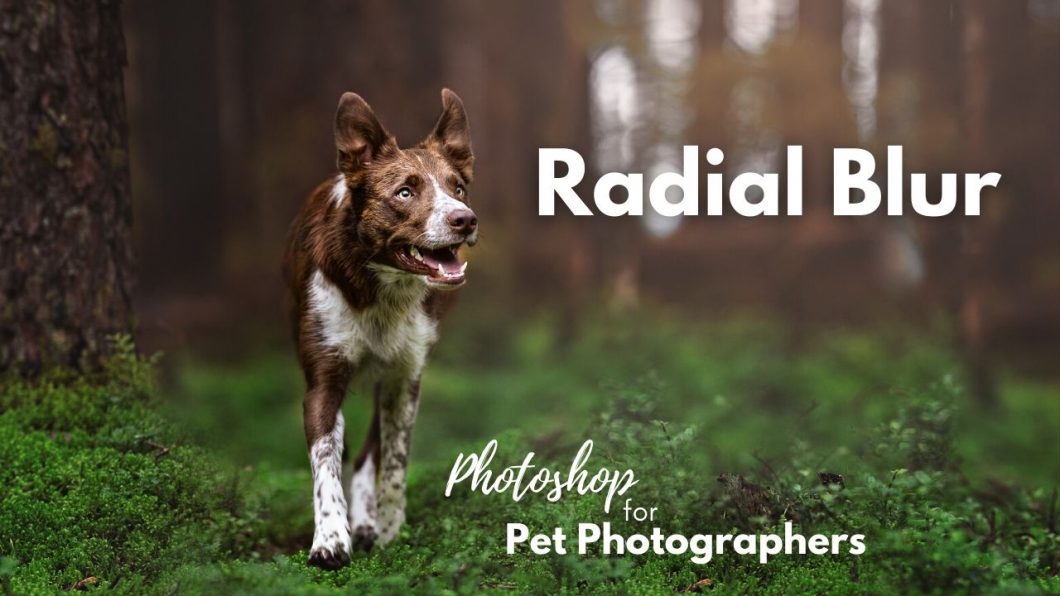
Radial Blur

Radial blur mimics a technique you can apply when using an off-camera flash, and a slow shutter speed. In this scenario, as you trigger the shutter, you would either turn/tilt the camera to the side, creating a circular blur due to the slow shutter speed, but keeping the subject frozen due to the flash, OR, you could zoom the lens out, creating a zoom effect around the subject, who is frozen due to the flash.

I tend to only use this technique very mildly, and only when there is already something in my scene creating a “radial” shape. This effect just emphasises that shape, and really spirals the viewer into the middle of the image. I would definitely not be using it on images where the dog is in an open space, or where this shape wasn’t already present in the foreground or background.

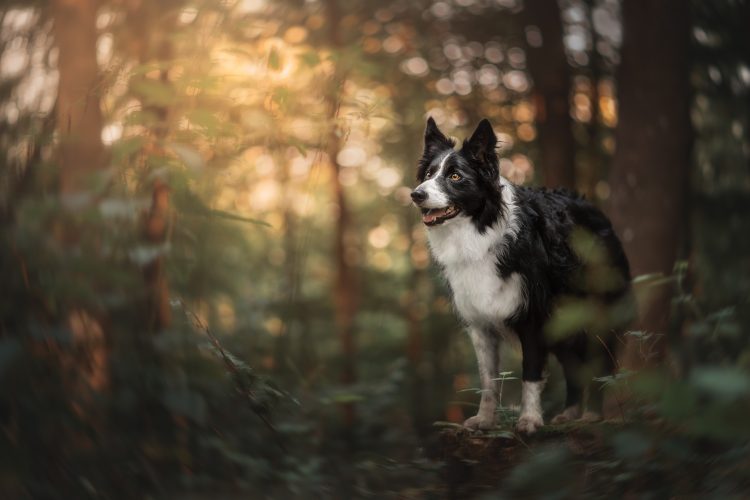
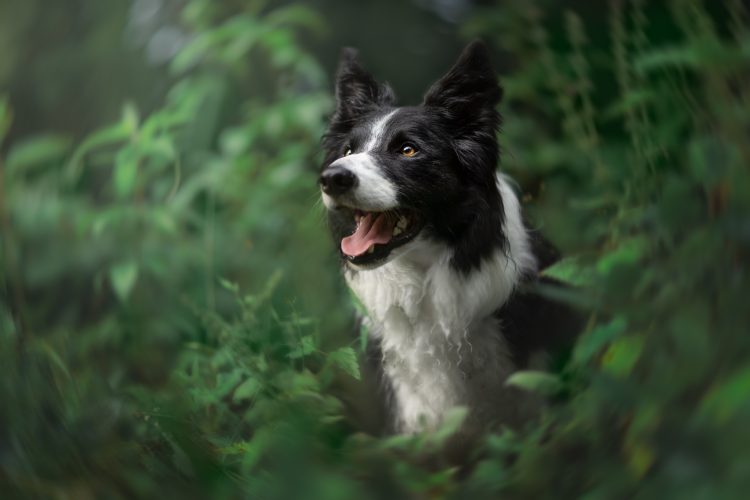
Examples of where I’ve used it:

We have two ways we can apply Radial blur to our image, depending on what we’ve done to the image beforehand.

If we’ve done some copy/flip, Content Aware or similar we can either:

  • simply apply it to a non-smart object image layer, like our smooshed layer that we’ve been using in earlier lessons (note: duplicate your smooshed layer first!!). We can then mask it in.
    • The problem with this is that we can’t change the amount of blur, or remove it from the image. It’s applied to the pixels. As soon as we save and close Photoshop, or go further down the editing path, we will struggle to undo that effect if we change our minds. It is inflexible editing.
  • The other option is to make a duplicate of your smooshed layer, click Filter > Convert for Smart Filters. This will make it a Smart Object of sorts.
    • Now, when we apply the Radial blur filter to the layer, it is applied as a Smart Filter which means we can turn it off, edit it, make it stronger or weaker, etc. It is flexible editing.

If you do not have other image layers/a smooshed layer & are still working with your original:

  • make a new version of your smart object (Duplicate will work here, as if we go into Camera Raw Filter we want any changes to apply to the gaussian blur layer too)
  • go to Filters> Radial Blur
  • Choose if you want Radial, or Zoom. If using radial, you probably want the strength between 1-3. Zoom can be a bit stronger.
  • Move the centre of the radial/zoom over where you think the subject probably is in the image.
  • Hit ok. Then mask out the effect where you don’t want it.

Since you’re working on a Smart Object layer already, it will be applied as a Smart Filter, so the effect will be editable at any point. 

Curves for Contrast

We can also use curves layers to alter the contrast of an image.

Remembering that contrast is the difference between the blacks and whites. When we have more blacks and whites (not in terms of colour, but in terms of light) then we have stronger contrast. When we have everything “in between” and probably feeling a bit flat, we have less contrast.

Playing with contrast can be an effective way to draw your viewer’s attention to different places of the image. Their eyes are more likely to be drawn to areas of higher contrast, rather than lower contrast. You can also help your dog to stand out more by playing with contrasts – a black dog will stand out in a scene with less true blacks, for example, as he will be the only source of contrast. 

There are a few ways we can affect contrasts with the curve.

  • Put a point somewhere along the curve and pull the blacks up. This gives us a “matte black” or “film look”. You can also play with moving the blacks point to the right a little, and pulling the whites down.
  • Add contrast by making a gentle “S” shape in the curve – pulling the shadows down a little to make them stronger, pulling the highlights up a little to make them brighter. 
  • Removing contrast from somewhere that shouldn’t be contrasty, by doing a reverse S shape – pulling the shadows up to brighten them, and pulling the highlights down to darken them. 

Don’t forget that you can lower the opacity to soften the effect if it’s a bit much. 

A note on saturation

Using curves layers to add black/darkness can also add saturation to your image. If you find the colours are getting too much for you, or you just need the curves layer to darken your photo without affecting the colours, change the blend mode to “luminosity”. That will mean that the only thing which is changed is the light tones. 

Creating a layer mask

Let’s go ahead and merge some layers together.

You can download the images I’m using in this video, or use two of your own, it’s up to you

In the folder above, you’ll find several files. Some have my lightroom edits included, some are just the .raw files, and some are .tif files. It’s up to you which ones you want, but essentially you’ll just need one of Loki, and one of Journey. 


Open them both in Photoshop. I (almost) always work as a “Smart Object” so that’s what I’ve done.

Copy the Journey layer across to the Loki file. Do this by being in the Journey layer, and hitting cmd + c on your keyboard. Make sure the image doesn’t have marching ants around the outside. If it does, just do cmd + d to deselect. Cmd + V into the Loki image.

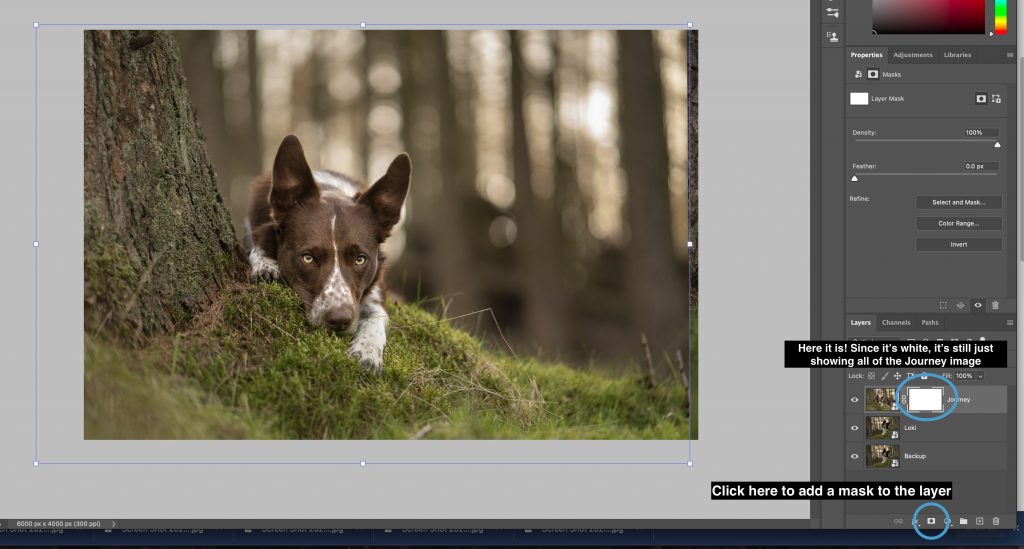
Now we need to apply a layer mask so we can hide parts of the Journey layer and show the Loki layer through from underneath. Find the little symbol at the bottom of the layers panel that looks like a square/rectangle with a circle in the middle. This will apply a layer mask to the layer you have selected.

Now it’s your turn to play!

Press B on your keyboard to get the Brush Tool.

Make sure the layer mask thumbnail is selected, not the image thumbnail.

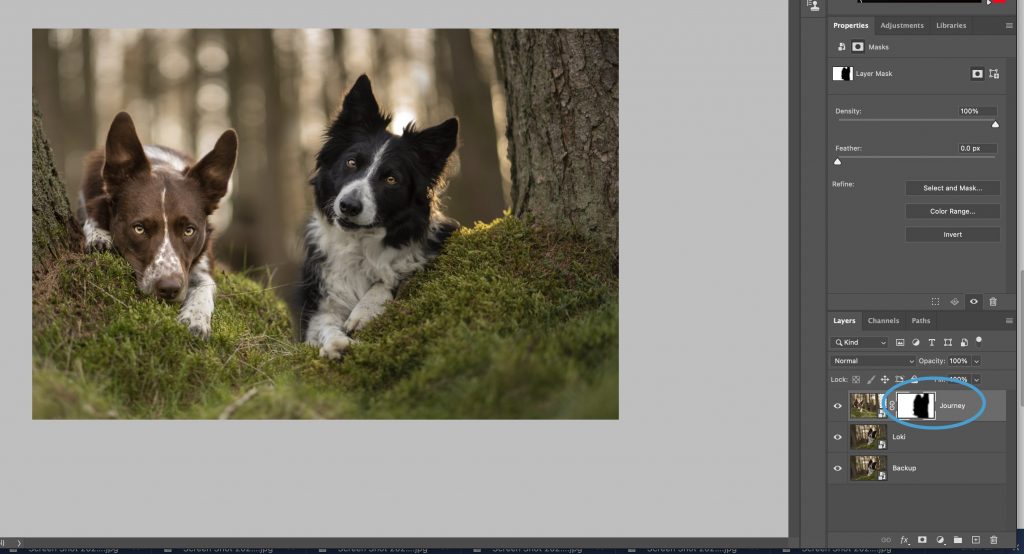
Make sure it’s on black (remember, we’re turning off the lights/hiding part of this Journey layer) and paint with the brush wherever you don’t want to see the Journey layer.

There are a few other things you can try now too. Click on the transform/move tool (or press  on your keyboard) and move the Journey layer to the side a bit so you could make an image with both of them in it. 

You could also click and drag the Journey layer underneath the Loki layer. Apply a layer mask to the Loki layer, and try hiding parts of it with the black brush.

Swap between black and white by pressing x on your keyboard, and have a play with showing and hiding different parts of the layers. Feel free to copy another layer across and do the same thing! The best way to learn here is to experiment and play. If anything goes wrong, either just: press cmd + z, or delete the layer (right click on the layer’s name & delete layer), or close the image without saving. 

Nothing you do here will permanently damage your image unless you’ve not opened it as a smart object, have painted with the brush on the image layer, have saved the image, and have closed Photoshop. And even then, your original RAW file will still be untouched.

Important Keyboard Shortcuts

Don’t feel like you have to memorise all these right now! There won’t be a test! 

When I was learning them, I wrote the important ones down on a post-it and stuck it above my computer so I could glance up and see them as I was working. 

Obviously if you use a different program to Photoshop, you’ll have to find the equivalent shortcut.

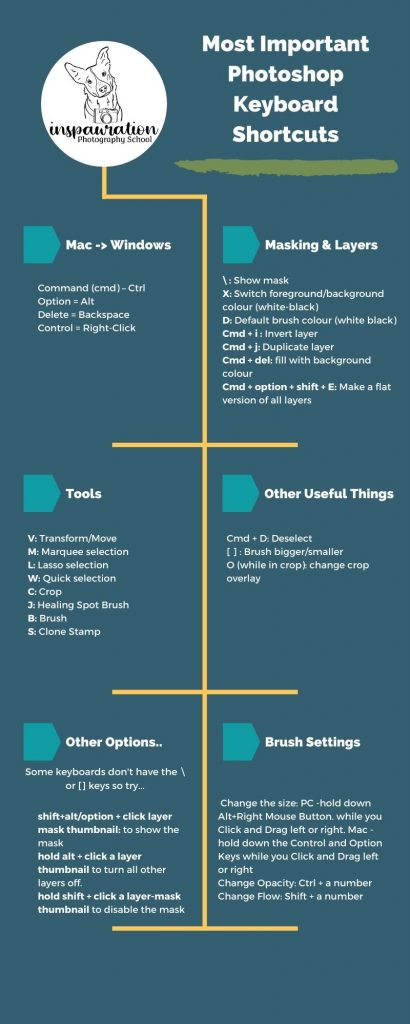
Mac -> Windows

I’ve written the shortcuts in the Mac version but they should be pretty interchangeable.

Mac
Windows
Cmd/Command
Control
Option
Alt
Delete
Backspace
Control
Right Click

Masking & Layers

Shortcut
Outcome
\
Show layer mask
X
Switch foreground/background brush (white-black)
D
Default brush colours (white/black)
Cmd + i
Invert layer (eg., make white mask black)
Cmd + J
Duplicate layer
Cmd + Delete
Fill with background colour
Cmd + option +shift + E
Make a flat version of visible layers

Changing Tools

Shortcut
Outcome
B
Brush tool
S
Clone Stamp tool
C
Crop Tool
J
Healing brush tool
V
Transform/Move Tool
M
Maquee Selection Tool
L
Lasso selection tool
W
Quick selection tool

Other Useful Things

Shortcut
Outcome
{ }
Make brush bigger/smaller
O (in crop tool)
Change crop overlay
Cmd + D
Deselect
Shift + alt + click layer mask thumbnail
Show layer mask (same as \)
Alt + Click layer mask thumbnail
Hide all other layers
Shift + click layer mask
Disable the mask

Using Your Smart Object

As mentioned in the previous lesson on Using your Smart Object, if you are smart and creative about how you work, you can make use of the two smart objects at the bottom of your layers panel, to do some reasonably subtle colour adjustments.

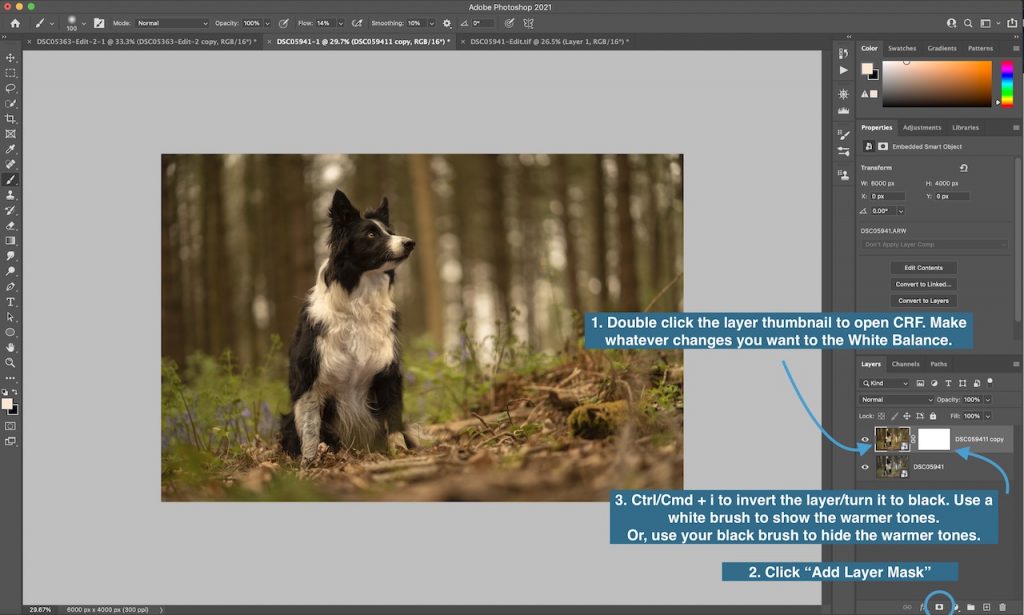
I don’t use this method for anything big or dramatic. It’s more useful for if I want to change the white balance in certain parts of my image. Because I’m working on the RAW file when accessing the Smart Object through the Camera Raw Filter (assuming you’ve opened your file from RAW directly to a smart object, and you haven’t converted a normal layer INTO a smart object), then you’re working with RAW data.

This means changes to your white balance are more subtle, and more precise. What might be a 20 point white balance shift in CRF could be +1 or +2 with a “Colour Balance” adjustment layer. 

Adjusting your WB on the RAW file just gives you a lot more subtlety, if you only want to very slightly tweak things.


High Pass Filter

The high pass filter is a simple action you can run, where Photoshop will complete a series of steps applying a high pass filter to your image.

High Pass filter basically finds the edges of parts of your image (things like eyes, fur, etc) and when coupled with a blend mode that adds contrast, accentuates those edges. The good thing about the high pass filter is that is is a way to sharpen the image without being destructive. It doesn’t add noise because it isn’t sharpening the pixels, but rather defining the edges of parts of your image.

This therefore works best if there are some edges for it to “see”. If you have a very black, dark, under-exposed dog with dark eyes, and it is significantly out of focus, it will have no edges to pick up on, and probably won’t do a very good job.

It can therefore work too well on images with defined “edges” (like Loki’s bright eyes against his dark fur) and you will definitely want to lower the opacity on the layer quite a lot so that the eyes don’t end up glowing and being out of control.

I recommend lowering the opacity to at least 50% in most cases anyway. This filter is strong and the eyes can very quickly look over-sharpened and over-worked.

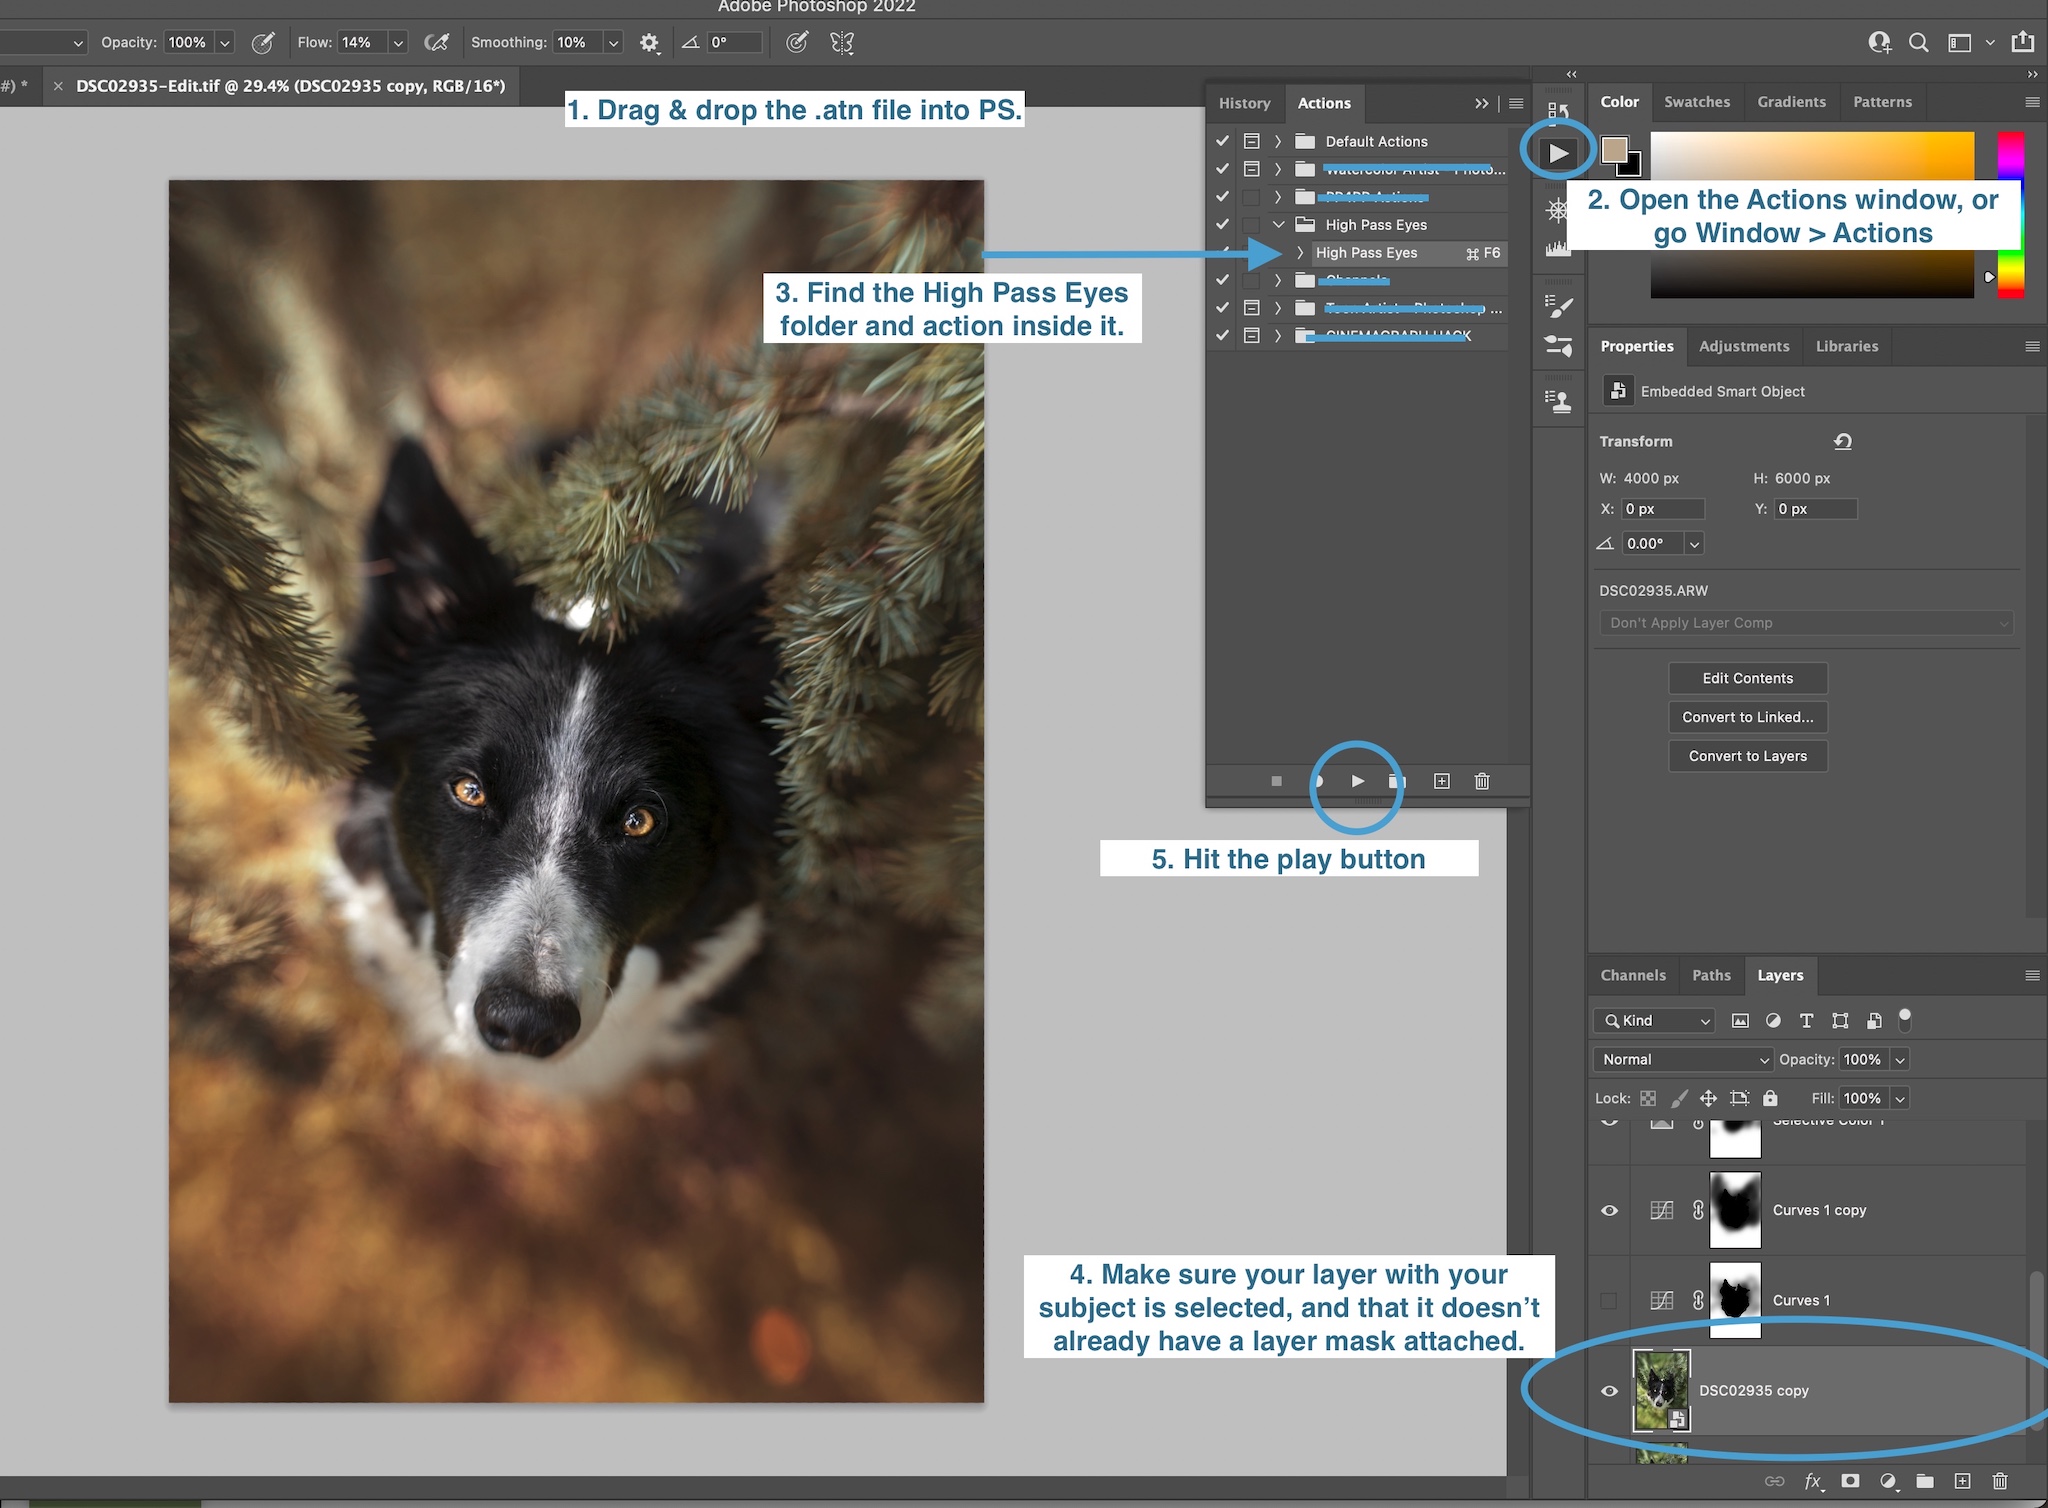
To install & use the action:

  • Download it to your computer
  • Unzip it (or just download the .atn file)
  • Drag and drop the file into Photoshop.
  • Go into Photoshop to the photo you want to sharpen.
    • Be on a layer with the dog. If you’ve messed around with the background, you need to be on the layer with the subject. 
    • If the layer already has a layer mask, either create a duplicate layer and remove the layer mask, or choose a different layer without mask. 
  •  Open the Actions menu (it looks like a play button) if you have it on your workspace. Otherwise, go to Window > Actions
  • Find the High Pass Eyes folder. Click it. 
  • Click “> High Pass Eyes”
  • Click the play button at the bottom of the Actions window.
  • Photoshop will run a series of steps including creating a new grey layer.
    • Move this so it’s above your subject layer if it isn’t already.
  • Mask in the areas you want to be sharpened
  • Lower opacity as required.